Safe, unguided alpine travel depends less on the gear you carry and more on your ability to accurately interpret the mountain’s subtle feedback and exercise disciplined judgment.
- Recognize cognitive decline from hypoxia before it leads to critical errors by using objective self-tests.
- Master reading environmental cues, from cloud formations to topographical map signatures, to anticipate and avoid hazards.
Recommendation: Treat alpine skills as perishable. Commit to a continuous cycle of deliberate practice to maintain the sharp judgment your life depends on.
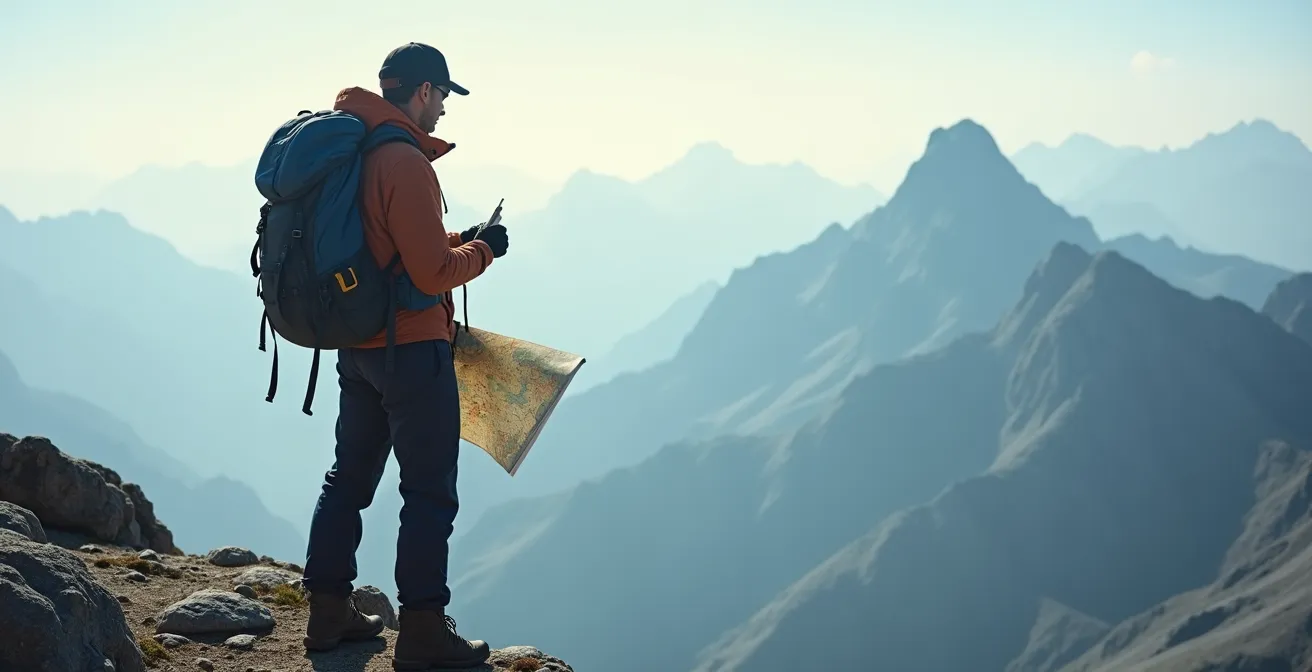
The step from a marked trail to the untracked alpine environment is a profound shift. For the experienced hiker, it promises unparalleled freedom and challenge. However, this transition is not merely a change in scenery; it’s a fundamental change in the rules of engagement. Many approach this step by focusing on gear lists and physical conditioning, believing these are the keys to safety. While important, they are secondary. The real determinant of your survival when venturing off-trail without a guide is your capacity for environmental judgment—the ability to read the terrain, the weather, and your own body as a dynamic system of feedback.
Standard advice often revolves around carrying the “ten essentials” or knowing basic map and compass work. For the high-alpine scrambler, this is dangerously insufficient. The environment above the treeline is complex and unforgiving. The most critical mistakes—misjudging a storm’s speed, underestimating the effects of altitude, or choosing a poor line on a scree field—are rarely caused by a lack of equipment. They are born from a failure to interpret subtle cues that the mountain provides long before a situation becomes critical. This is not about intuition; it’s about a learned, disciplined process of observation and decision-making.
This guide deliberately avoids generic checklists. Instead, it provides a mental framework, the same kind a professional guide uses to manage risk. We will not focus on what to pack, but on how to think. The core principle is this: your brain is your primary tool, and its effectiveness is directly threatened by the very environment you seek to explore. We will deconstruct the key environmental threats—hypoxia, weather, terrain—and provide specific, actionable methods for assessing them. The goal is to shift your mindset from a passive hiker following a path to an active navigator engaged in a constant, critical dialogue with the mountain.
To navigate this complex topic, we have structured this guide to build your judgment from the inside out. You will learn to assess your own cognitive state before learning to assess the external environment, ensuring your most critical tool—your mind—is reliable.
Summary: A Guide’s Framework for Unguided Alpine Navigation
- Why hypoxia causes bad decisions above 2,500 meters without you noticing?
- How to predict an afternoon thunderstorm using only cloud formation cues?
- Hard Shell or Soft Shell: Which is essential for variable alpine winds?
- The footing mistake on scree slopes that leads to ankle sprains for 60% of beginners
- What to do immediately if fog descends while you are off-trail?
- How to identify uncrossable ridges on a map before you start climbing?
- What are the 3 steps to ensure water is virus-free in developing countries?
- How to Retain 90% of Maintenance Skills Learned in Technical Workshops?
Why hypoxia causes bad decisions above 2,500 meters without you noticing?
Above 2,500 meters (approx. 8,200 feet), the air contains less oxygen. This state, known as hypoxia, has a direct and insidious effect on your brain’s executive functions. The danger isn’t the physical fatigue; it’s the degradation of your judgment. You become overconfident, your short-term memory falters, and your ability to perform complex calculations—like estimating time to a summit or navigating a complex route—diminishes significantly. Because hypoxia induces a state of mild euphoria, you are often the last person to realize you are impaired. This cognitive decline is a primary factor in a cascade of poor decisions, from simple navigation errors to a fatal reluctance to turn back.
The transition to Acute Mountain Sickness (AMS), characterized by headache, nausea, and fatigue, is a clear sign of poor acclimatization. However, the dangerous phase of cognitive impairment precedes these physical symptoms. Studies on pre-acclimatization show a dramatic difference in outcomes; one found participants undergoing conditioning had only a 6% incidence of AMS at 3,611m, compared to 47% in the unacclimatized group, demonstrating how proactive strategies can mitigate risk. Relying on “feeling good” is not a reliable safety strategy. You must implement an objective system for measuring your own cognitive performance at regular intervals.
This is not a matter of physical toughness. Every unacclimatized person is susceptible. The professional’s approach is to remove subjectivity and rely on data. A simple, structured cognitive self-test provides this data, allowing you to identify a dangerous trend in your mental state before it compromises your safety. It is a non-negotiable safety check for any serious alpine travel.
Action Plan: The Cognitive Self-Test Protocol for Altitude
- Establish a Baseline: Before your trip, time yourself performing a complex mental math problem (e.g., subtracting 13 from 247 repeatedly). This is your sea-level benchmark.
- Test at Altitude: Every hour above 2,500m, or at every major break, repeat the same math problem and compare the time and accuracy to your baseline. Any significant decline is a red flag.
- Verbalize Your Plan: Explain your next three navigation steps out loud in a logical sequence to your partner or to yourself. If you struggle to form a coherent plan, you are impaired.
- Conduct a Landmark Check: Name five visible peaks or major landmarks on the horizon. Difficulty in recalling names or identifying features indicates cognitive slowing.
- Take Corrective Action: If your performance has degraded, do not ascend further. Descend at least 300 meters and re-evaluate. This is a non-negotiable rule.
How to predict an afternoon thunderstorm using only cloud formation cues?
In the mountains, a weather forecast provides a general outlook, but it cannot predict the precise location and timing of a localized thunderstorm. Your life depends on your ability to read the sky and recognize the buildup of convective energy in real-time. Afternoon thunderstorms are a common and serious hazard in alpine environments, driven by the sun heating the mountain slopes. This process follows a predictable visual pattern, and learning to identify its stages gives you the crucial hours needed to retreat to safety. Relying solely on a forecast is a passive approach; active observation is the key to survival.
The process begins with small, puffy cumulus clouds. These are fair-weather clouds, but in the mountains, they are the seeds of a storm. The critical indicator of a growing threat is vertical development. When these small puffs begin to grow upwards, forming towering, cauliflower-like structures known as cumulus congestus, the “engine” of the storm is building. This is your primary warning sign. At this stage, the storm is actively drawing moist air upwards, and you should already be implementing your descent plan. Waiting until you see the dark, anvil-shaped top of a mature cumulonimbus cloud means you have waited too long.

As the illustration above demonstrates, the progression from harmless puff to threatening tower is a clear visual timeline. The final stage, the cumulonimbus with its flat, anvil-like top, indicates the storm has reached the top of the troposphere and is now capable of producing lightning, hail, and violent winds. At this point, you should already be in a safe location, not scrambling for cover. Recent observations from Alpine meteorological studies show a trend of earlier snowmelt, which can influence the timing and intensity of these spring and summer storms, making this skill more critical than ever.
Hard Shell or Soft Shell: Which is essential for variable alpine winds?
The debate between hard shell and soft shell jackets is often misunderstood. It is not about which is “better,” but about understanding their distinct roles in managing moisture—both from the inside (sweat) and the outside (precipitation). In the variable conditions of the alpine, where you can experience intense sun, biting wind, and sudden storms in a single hour, a sophisticated layering system is essential. Your choice is not simply a matter of comfort, but of thermal regulation and survival. A failure to manage moisture effectively can lead to hypothermia, even in summer.
A soft shell is designed for breathability. Its primary function is to block wind while allowing the vast amount of moisture vapor you produce during high-output activity to escape. It is your primary action layer, the one you should wear 90% of the time in dry, windy conditions. A hard shell, conversely, is an emergency layer. Its primary function is to be waterproof, blocking external moisture like rain or sleet. However, even the most “breathable” waterproof fabrics cannot transport moisture as efficiently as a soft shell, meaning you will quickly become soaked with sweat from the inside if you wear it during strenuous exertion.
The professional approach is a hybrid one: you live in your soft shell and carry an ultralight hard shell in your pack exclusively for when precipitation begins. This system prioritizes managing your body’s own moisture output, which is a constant threat, while having an impermeable barrier ready for the intermittent threat of rain. The table below clarifies the specific roles and ideal conditions for each garment, forming the basis of a reliable moisture management system.
This comparison of moisture management systems, based on an introduction to alpine principles, highlights the specialized function of each shell type.
| Shell Type | Primary Function | Best Conditions | Breathability | Weight |
|---|---|---|---|---|
| Soft Shell | Manages internal moisture (sweat) | Dry, windy, high-output activity | High air permeability | Light (200-400g) |
| Hard Shell | Manages external moisture (rain/snow) | Wet conditions, emergency protection | Low/waterproof | Ultralight (150-300g) |
| Hybrid Approach | 90% soft shell use, 10% hard shell backup | Variable alpine conditions | Situational | Combined 450-600g |
The footing mistake on scree slopes that leads to ankle sprains for 60% of beginners
Scree slopes—vast fields of loose, broken rock—are a common feature of alpine terrain and a major source of injuries for the uninitiated. The natural instinct when descending a steep, unstable surface is to lean back and land on your heels, attempting to brake. This is the single most dangerous mistake you can make. A heel-first landing on scree creates a pivot point, causing your foot to slide forward and your ankle to roll outwards, resulting in a severe sprain or fracture. For many beginners, this mistake accounts for the majority of lower-leg injuries on off-trail adventures.
The correct technique is counter-intuitive and requires discipline. It is known as the “flat-foot plunge” or “scree skiing.” You must maintain an athletic stance with your knees bent and your weight centered, or even slightly forward, over your feet. Instead of landing on your heel, you land with your entire foot striking the scree simultaneously, with your ankle locked at a 90-degree angle. This creates a larger platform that distributes your weight and allows the entire boot to sink slightly into the loose rock, creating stability rather than a pivot point. Trekking poles should be used for balance only, like a cat’s whiskers, never to bear your full weight.
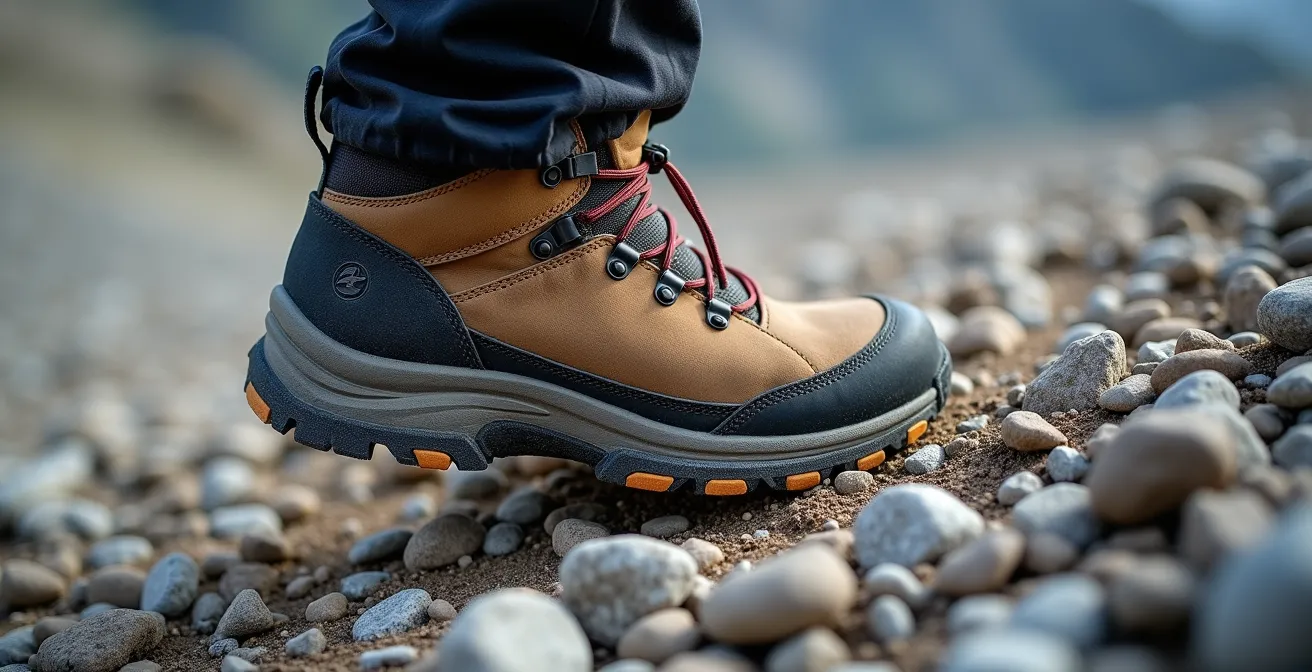
As the detailed view above shows, the flat-foot technique maximizes contact between your boot sole and the unstable surface. On steeper slopes, this evolves into a controlled slide, where you take long, plunging strides and “ski” the scree in a controlled manner, often following natural channels where the rock is looser and flows more predictably. This technique requires commitment and practice in a safe environment. According to safety guidance from the Alpine Rescue Team, mastering terrain-specific movements like this is a core competency for unguided travel.
What to do immediately if fog descends while you are off-trail?
A sudden, thick fog or “whiteout” in the mountains is one of the most disorienting and dangerous situations you can face. Visibility can drop to a few feet in minutes, erasing landmarks and the horizon. The immediate human instinct is to push on, to find a way out, fueled by a rising sense of panic. This is almost always the wrong decision and often the first step toward becoming hopelessly lost. When sensory input is removed, your internal sense of direction becomes completely unreliable. The only safe response is to fight this instinct and impose a rigid, logical protocol.
The universally accepted procedure is the S.T.O.P. protocol: Stop, Think, Observe, and Plan. It is a mental brake that forces you to override panic with methodical action. The very first step—stopping all movement—is the most critical. By anchoring yourself in one spot, you prevent yourself from wandering further into unknown terrain and potentially over a cliff or into a gully. Only once you have controlled your movement and your panic can you begin to gather information and make a rational decision.
This is the moment when your discipline is tested. You must trust your instruments (altimeter, compass, GPS) over your own flawed perceptions. Can you retrace your steps using a GPS breadcrumb trail? Is there a linear feature, like a stream or a ridgeline, that you can use as a “handrail” to navigate? If the answer to these questions is no, the correct decision is often the hardest: stay put, prepare a bivouac, and wait for the fog to lift. As the experts at the Alpine Rescue Team state in their mountain safety rules:
If lost, bivouac. Be willing to turn back: the mountains don’t care. Your survival depends upon you!
– Alpine Rescue Team, Mountain Safety Rules
How to identify uncrossable ridges on a map before you start climbing?
Your most important safety decisions are made before you even put your boots on. Thorough route planning using a detailed topographic map allows you to identify and avoid objective hazards, such as impassable cliffs or dangerously steep slopes, from the safety of your home. Relying on “figuring it out as you go” is a recipe for being “cliffed out”—trapped above a vertical drop with no safe way up or down. A map is not just a tool for finding your way; it is a predictive tool for understanding terrain in three dimensions.
The key lies in interpreting how contour lines represent the shape and steepness of the land. Contour lines that are packed very tightly together indicate a steepening slope. When they merge into a single, thick line or are replaced by special symbols, it represents a cliff. Modern digital mapping tools like CalTopo offer slope-angle shading, which color-codes the map to show areas that exceed certain steepness thresholds, making avalanche terrain or no-fall zones instantly visible. However, you must also be able to recognize these features on a standard paper map.
Certain contour patterns are red flags that demand further investigation through photos or satellite imagery before you commit to a route. “White space” on a map—areas with no contour detail—can be particularly deceptive, potentially hiding a “knife-edge” ridge or a series of rock towers (gendarmes) that are impossible to traverse. The table below, derived from alpine terrain analysis principles, outlines the most critical map signatures to look for.
| Map Feature | Contour Pattern | Real Terrain | Passability |
|---|---|---|---|
| Cliff Hachures | Short tick marks pointing downhill | Vertical cliff faces | Impassable |
| Convex Slope | Widening contours uphill | Easing angle as you ascend | Generally passable |
| Concave Slope | Tightening contours uphill | Steepening headwall | Often impassable |
| White Space | No contour detail | May hide gendarmes or knife edges | Requires photo verification |
What are the 3 steps to ensure water is virus-free in developing countries?
While this guide focuses on alpine terrain, the principle of self-sufficiency extends to ensuring the safety of your drinking water, a skill that is critical in both remote wilderness and during travel in developing countries. Dehydration is a serious threat that impairs physical and cognitive function, but consuming contaminated water can be even more debilitating. Waterborne pathogens fall into three categories: protozoa (like Giardia), bacteria (like E. coli), and the smallest and most difficult to deal with, viruses (like Norovirus or Hepatitis A). A comprehensive water purification strategy must reliably neutralize all three.
The three-step method provides redundant safety. The steps are:
- Filtration: Use a modern hollow-fiber filter with a pore size of 0.2 microns or smaller. This will reliably remove all protozoa and bacteria. However, most portable filters cannot remove viruses, which are much smaller.
- Purification: After filtering, the water must be treated to neutralize viruses. This can be done with chemical treatments (chlorine dioxide tablets or drops) or with a UV light purification pen. This second step is absolutely essential in areas where viral contamination is a risk.
- Boiling: Boiling is the most reliable method of all, killing every type of pathogen. However, it is time- and fuel-intensive. A critical consideration at altitude is the lower boiling point of water. As altitude physiology research confirms, water’s boiling point drops to approximately 91°C at 2,500-3,000m. To compensate, you must maintain a rolling boil for at least three minutes to ensure all pathogens are killed.
The “filter then purify” combination is the most efficient for on-the-go use, with boiling reserved as a backup or for in-camp use. Relying on a filter alone is an incomplete and dangerous strategy in many parts of the world.
Key Takeaways
- Your primary safety tool is not your gear, but your capacity for clear, disciplined judgment under pressure.
- The alpine environment provides constant feedback; your job is to learn the language of clouds, wind, and terrain to make decisions proactively, not reactively.
- Safety is a function of humility: the humility to test your own cognitive state, to turn back when conditions change, and to continuously practice your skills.
How to Retain 90% of Maintenance Skills Learned in Technical Workshops?
Attending a workshop on knots, navigation, or self-arrest is an excellent first step. However, these are perishable skills. The confidence you gain in a controlled, one-day course will evaporate rapidly without a structured system for retention. In a high-stress situation—caught in a whiteout or on a steep, exposed slope—you will not rise to the occasion; you will fall back to the level of your training. If that training has not been consistently reinforced, you will be unable to perform the very skills you need to save your life. Skill acquisition is easy; skill retention is the real challenge.
The solution is to treat your alpine skills like a physical training program. You must actively fight against “skill decay” with a deliberate, scheduled practice regimen. The goal is to move knowledge from your conscious mind into muscle memory, so that you can perform critical tasks flawlessly under duress. This means practicing in non-ideal conditions: tie your essential knots while wearing thick gloves, check your compass bearing in low light, and practice your footwork on unstable ground. As is often highlighted by professional training platforms, expert instruction is the starting point, but personal commitment to practice is what builds true competence. Many of the instructional videos on a platform like AlpineSavvy are presented by certified guides, providing an excellent benchmark against which to compare your own technique.
Create a system. For example, implement a “Teach to Learn” method where you explain a skill to a less experienced partner; the act of teaching forces a deeper level of understanding. Use video to your advantage by recording yourself performing a technique and comparing it to an expert demonstration. A schedule of frequent, short “micro-practice” sessions (e.g., five minutes of knot tying daily) is far more effective than a single, long session once a month. This commitment to maintenance is what separates a knowledgeable amateur from a competent, self-reliant alpinist.
Adopting this framework of environmental judgment, self-assessment, and continuous practice is the only responsible way to approach unguided alpine travel. Your safety is not a matter of chance; it is the direct result of the discipline you cultivate and the decisions you make long before the consequences become apparent. Start building that discipline today.