In summary:
- Stop leaning back on steeps; it disengages your edges and accelerates you. A forward, active stance is key to control.
- True edge grip comes from angulation (bending joints), not just inclination (leaning your whole body). This is the secret to holding on ice.
- Ill-fitting boots are the number one equipment flaw holding you back. The common mistake is buying boots that are too big, causing shin bang and loss of control.
- Ski-specific fitness, started 6-8 weeks before your trip, prevents afternoon fatigue and builds the power needed for dynamic turns.
You’ve mastered the basics. You can link turns down most blue runs and even some reds, but when the pitch gets steep or the snow turns icy, something breaks. That familiar feeling of skidding, of losing control, of leaning back in a desperate attempt to slow down—that’s the intermediate plateau. It’s a place where many skiers get stuck for years, watching with envy as others carve effortlessly down black diamond terrain.
The common advice is to “get a lesson” or “just lean forward,” but that rarely addresses the root cause. The truth is, advancing from intermediate to expert isn’t about trying harder; it’s about understanding the specific biomechanics and physics of control. It’s about deconstructing the bad habits that feel safe but are actually holding you back. This isn’t just about skiing more; it’s about skiing smarter.
This guide moves beyond generic tips. We will dissect the precise technical flaws, equipment myths, and fitness gaps that define the intermediate plateau. We’ll focus on the ‘why’ behind the ‘what’—why leaning back accelerates you, how your skeleton creates edge pressure, and which off-snow exercises directly translate to on-snow power. By the end, you won’t just know what to do; you’ll understand the fundamental principles that allow you to generate control and confidence on any slope.
For those who prefer a visual format, the following video explores one of the golden rules of ski technique. While the narration is in French, the visual demonstration of proper body position is universal and perfectly complements the principles we are about to discuss.
To help you navigate these critical concepts, we’ve structured this guide to address the most common and impactful areas for improvement. Each section tackles a specific question or problem that, once solved, will unlock a new level in your skiing.
Summary: Unlocking Advanced Skiing Techniques
- Why leaning back on steep slopes actually increases your speed uncontrollably?
- How to engage your edges properly to stop skidding on icy patches?
- Demo Skis or Own Gear: Is it worth paying extra to test high-end models?
- The sizing mistake that leaves 80% of recreational skiers with sore shins
- When to start leg blasters to prevent fatigue by 2 PM on your ski trip?
- How to fix the one running gait flaw that causes your knee pain?
- Why jumping onto a box is safer than jumping off it for your knees?
- How Can Amateurs Use Pro Performance Centers to Hack Their Fitness?
Why leaning back on steep slopes actually increases your speed uncontrollably?
It’s the most common defensive move in skiing and the single biggest barrier to progression. When the slope gets steep, your survival instinct screams “lean back, away from the fall line!” But this instinct is wrong. Leaning back shifts your center of mass behind your boots, effectively lifting the front of your skis and disengaging the most important part of their sidecut. Your skis, no longer able to bite into the snow to complete a turn, flatten out and accelerate. It’s a vicious cycle: you lean back to slow down, which makes you go faster, which makes you lean back even more.
The solution is a counter-intuitive but crucial shift to an active, forward stance. Your shins should be actively pressing into the tongue of your boots, keeping your weight centered. This pressure engages the entire length of your ski’s edge from the tip, allowing the ski’s design—its sidecut—to do the work of turning and controlling speed. Indeed, research shows that while reaching intermediate level typically takes only a few weeks of experience, overcoming this fundamental stance issue is what keeps many skiers stalled indefinitely.
Think of your skis as two arcs. When your weight is forward, you are pressing the ski into the snow, forcing it to bend into its natural arc. This arc is what creates a clean, controlled turn. When you lean back, you are essentially trying to steer a straight ski, which results in skidding and a terrifying loss of control. The feeling you should seek is that your feet are slightly behind you, always chasing your upper body down the hill. Mastering this forward pressure is the first and most critical biomechanical link to unlocking advanced terrain.
How to engage your edges properly to stop skidding on icy patches?
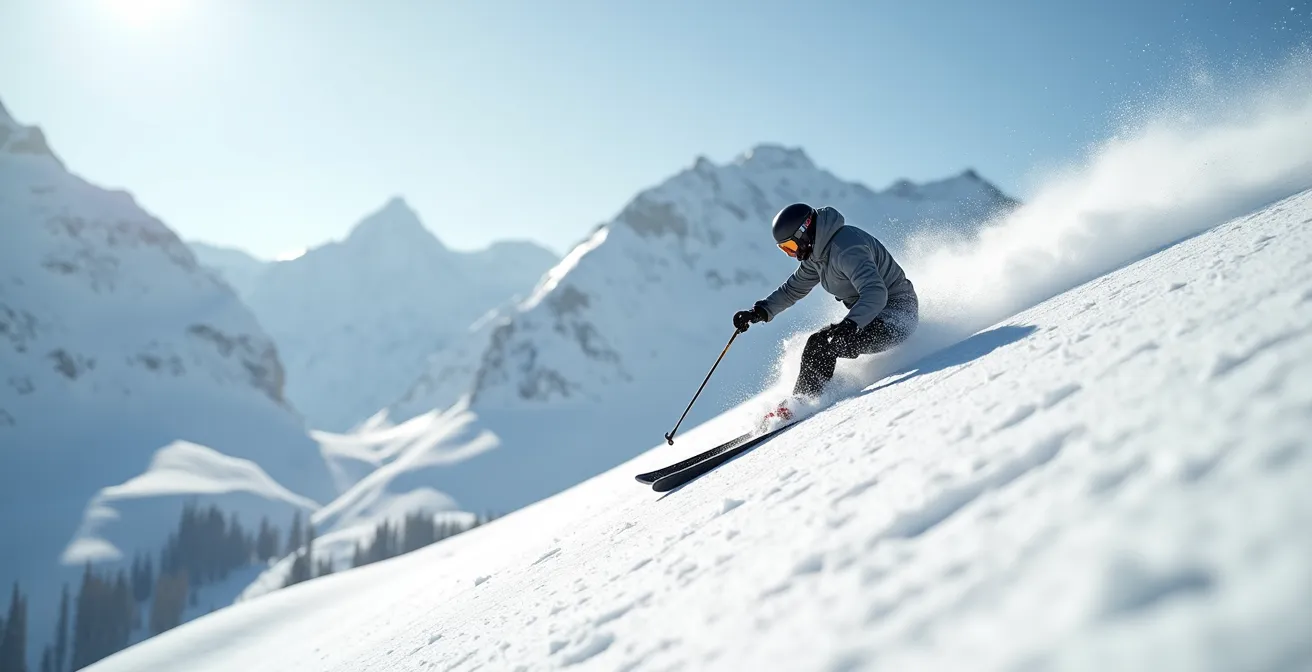
There’s no sound more unnerving to an intermediate skier than the scrape of a skidding edge on an icy patch. The common reaction is to lean the entire body harder into the hill, an action known as inclination. While it feels like you’re increasing edge angle, you’re actually unbalancing your body and making it more likely for your edges to wash out completely. The key to conquering ice is not inclination, but angulation.
Angulation is the art of creating angles within your body—at the ankles, knees, and hips—while keeping your upper body relatively upright and over your skis. This technique allows you to drive your ski edges into the snow with immense pressure without losing your balance. Imagine you are trying to push a heavy box across the floor. You wouldn’t just lean on it; you’d bend your knees and hips to drive power through your legs. The same principle applies here. You are creating a powerful edge platform to stand on.

The image above perfectly illustrates this concept. Notice how the ski is on a high edge angle, cutting cleanly into the hard surface. This is achieved by tipping the feet and knees into the turn while the hips and upper body counterbalance, remaining stable. This is the difference between skidding (sliding sideways) and carving (cutting forwards). Skidding happens when the edge angle is too low; carving happens when you create enough angulation to make the edge grip and follow its sidecut.
Case Study: The Angulation Breakthrough
A key insight from BASI Level 4 instructor methodology is the immediate improvement seen in intermediates who master angulation. By focusing on drills that separate lower and upper body movements (like holding poles out in front to keep the torso stable), skiers learn to tip their skis onto a high edge angle using their joints. The result is a dramatic increase in edge hold on ice, as they are able to apply maximum pressure directly over the edge without the risk of slipping out that comes from whole-body inclination.
Demo Skis or Own Gear: Is it worth paying extra to test high-end models?
For an intermediate skier, the right equipment can be a catalyst for breaking through a plateau, while the wrong equipment can be an anchor holding you back. This is particularly true for skis. As your skills evolve, the soft, forgiving skis that were perfect for learning can start to feel unstable at speed or fail to hold an edge on hard snow. This is where “demoing” high-performance skis becomes an invaluable tool for progression. Paying a little extra to test a few different models before you buy isn’t an expense; it’s an investment in your development.
Demoing allows you to feel the difference a ski’s construction makes. A ski with a layer of metal will feel much more stable and damp at speed. A different sidecut radius can make a ski quicker to turn or more stable in a long arc. You don’t need to be an expert to feel these differences. By testing skis designed for more advanced skiers, you can find a pair that offers more performance but is still manageable with your current ability—a ski you can grow into.
Using high-quality equipment that’s the correct fit and style will significantly impact your riding. Learning more about your gear’s technical limitations and attributes is essential for understanding the mechanics of what’s going on under your feet.
– Montec Magazine Editorial Team, Ski Tips for Intermediate Skiers Guide
When you demo, don’t just ski aimlessly. Have a plan and evaluate each ski systematically. The following table, based on criteria from a comprehensive guide for intermediate skiers, provides a framework for your testing.
| Testing Criteria | What to Evaluate | Key Questions |
|---|---|---|
| Turn Initiation | How easily the ski enters the turn | Does it require less effort than your current skis? |
| Edge Hold | Security on hardpack and ice | Do edges grip without chatter? |
| Stability at Speed | Calmness vs twitchiness | Does the ski feel planted or nervous? |
| Flex Pattern | How the ski bends under pressure | Can you flex it with your current technique? |
The sizing mistake that leaves 80% of recreational skiers with sore shins
You can have the best skis in the world, but if your boots don’t fit, you are fundamentally disconnected from them. Your ski boot is the steering wheel, the transmission, and the suspension of your entire ski system. A precise fit is non-negotiable for performance, and the single most common and debilitating mistake intermediate skiers make is buying boots that are too big.
It happens for an understandable reason: a “comfortable” fit in the shop often feels like your street shoe size. But a ski boot that is comfortable to walk around in is almost certainly too large to ski in. Once you are in a forward, athletic ski stance, your heel should be locked into the back of the boot. If there is space, your foot will slide forward on every turn, causing your toes to smash into the front and your shins to bang against the tongue as you try to find stability. This is “shin bang,” and it’s a direct symptom of a boot that is too big in volume or length.
The correct fit is a performance fit: snug all around, with toes just brushing the end of the shell when standing straight, and pulling back slightly when you flex forward. A good bootfitter will measure your foot length and width (the “mondo point” size) and recommend a shell that matches. They will then heat-mold the liner to customize it to the exact shape of your foot. This process eliminates empty space, ensuring that every tiny movement you make with your foot is transferred directly to your ski edge. Without this precise connection, you’re forced to make large, sloppy movements, which is a hallmark of intermediate, skidded turns.
When to start leg blasters to prevent fatigue by 2 PM on your ski trip?
That familiar burning sensation in your quads halfway through a ski day is more than just uncomfortable; it’s a primary cause of technical breakdown. When your legs fatigue, your athletic stance collapses, you start to sit back, and all the bad habits you’ve been fighting come rushing back. Building ski-specific endurance is not optional for progression. And the time to start is not the week before your trip—it’s at least six weeks out.
General fitness helps, but skiing places a unique demand on your muscles, specifically eccentric contractions (muscles lengthening under load) as you absorb terrain. “Leg Blasters” are a notorious but incredibly effective ski conditioning circuit because they mimic this exact demand. They combine different types of squats and lunges without rest to build muscular endurance and strength. But simply doing them isn’t enough; you need a structured approach, or periodization, to arrive at your ski trip strong, not sore.

A proper pre-season plan gradually increases the load on your body and then allows for recovery before your trip. This ensures your muscles have adapted and are at their peak, rather than being in a state of fatigue when you click into your bindings. Integrating exercises that target stabilizer muscles, like the adductors (inner thigh) and core, is also critical for maintaining turn symmetry and power.
Your 6-Week Ski Fitness Action Plan
- Weeks 6-5: Foundation Phase. Begin with 2 sets of leg blasters, focusing on perfect form over speed or quantity. This builds the neuromuscular pathways.
- Weeks 4-3: Build Phase. Increase the volume to 3-4 sets per workout. The intensity should gradually increase as your endurance improves.
- Week 2: Peak Week. This is your hardest week. Aim for 5 sets or the maximum number of quality reps you can achieve to push your limits.
- Week 1: Taper/Recovery. Drastically reduce volume to 1-2 light sets. The goal is to let your muscles fully recover and rebuild before day one of your trip.
- Integrate Key Stabilizers. Throughout the 6 weeks, add Copenhagen Planks (3 sets) for adductor strength and Pallof Presses (3 sets) for rotational core stability.
How to fix the one running gait flaw that causes your knee pain?
Many skiers use running as their primary off-season cardio, but a common running flaw can actually reinforce bad habits that hurt both your knees and your skiing. This flaw is over-striding: landing with your foot far out in front of your body’s center of mass. When you over-stride, your leg is straight upon impact, creating a braking force that sends a shockwave straight up your kinetic chain into your knee. It’s inefficient, and it’s a major cause of runner’s knee.
This directly relates to skiing. An athletic ski stance requires you to keep your center of mass moving forward over your feet. Over-striding in running is the biomechanical equivalent of getting stuck in the “back seat” when skiing. You’re letting your feet get out in front of you, putting you in a defensive, unbalanced position. Fixing this flaw in your running can have a profound, positive transfer to your skiing balance and power.
The fix is to focus on increasing your cadence (steps per minute) and landing with your foot more directly underneath your hips. This encourages a slight forward lean from the ankles and promotes better glute engagement, which are cornerstones of a powerful ski stance. You can use this as a form of balance training, not just cardio.
- Practice running up a slight incline or on stadium stairs; this naturally forces you into a forward lean and prevents over-striding.
- Focus on a foot strike that occurs directly underneath your center of mass, not out in front.
- Aim for a higher, quicker cadence, around 170-180 steps per minute. Use a metronome app to practice.
- Feel the powerful push-off coming from your glutes, not just your calves.
- Consciously apply this same feeling of a forward-moving center of mass when you are back on skis.
Why jumping onto a box is safer than jumping off it for your knees?
Plyometrics, or jump training, are a staple of ski conditioning for building explosive power. However, a common mistake in the gym can expose your knees to massive, unnecessary impact forces. Many people perform box jumps by jumping up onto a box and then jumping back down. The “up” part is great, but the “down” part can be dangerous. Jumping off a box and landing on the hard floor is a “depth jump,” an advanced exercise that creates extreme eccentric load.
In fact, biomechanical analysis shows that while box jumps focus on concentric muscle contraction (shortening/power generation), depth jumps can create 3-4 times higher impact forces on your joints. For an amateur athlete, this high-impact landing offers more risk than reward. The safer, more effective approach is to jump *onto* the box and then *step* down. This gives you all the benefit of the explosive “up” phase without the joint-jarring impact of the “down” phase.
To train the crucial skill of force absorption—which is what your legs do constantly when skiing moguls or variable snow—you should reverse the exercise. Stand on the box and step off, focusing on landing as softly and quietly as possible. This specifically trains your muscles to act as shock absorbers, which is a much more ski-specific and joint-friendly way to prepare for the demands of the mountain.
- Find a stable box approximately 40-60cm high.
- Stand on top, then step off with both feet, aiming to land simultaneously.
- The primary goal is to land as quietly as a cat. A loud landing means your bones are absorbing the impact, not your muscles.
- Upon landing, immediately sink into a deep squat position, absorbing all the force.
- Hold this bottom position for two seconds to demonstrate control before standing up.
Key Takeaways
- Your instinct to lean back on steep terrain is your biggest enemy; an active, forward stance is the foundation of control.
- Proper boot fit is non-negotiable. A snug, performance fit that locks your heel is the most important equipment investment you can make.
- Ski-specific fitness is about endurance and force absorption. Start a periodized training plan 6-8 weeks before your trip to prevent late-day fatigue and technical collapse.
How Can Amateurs Use Pro Performance Centers to Hack Their Fitness?
You don’t need access to a multi-million dollar sports science lab to gain a profound understanding of your own movement patterns. The single most powerful tool for technical analysis is already in your pocket: your smartphone. Pro performance centers use high-speed cameras and force plates, but amateurs can get 80% of the benefit by simply filming themselves and learning what to look for.
As one BASI Level 4 Instructor from The Snow Chasers notes, self-analysis is brutally honest and effective.
The camera doesn’t lie. What feels aggressive and dynamic in your head might look like someone tiptoeing through porridge.
– BASI Level 4 Instructor, The Snow Chasers – Intermediate Plateau Analysis
By filming yourself performing simple movements, you can spot the same imbalances that a pro-level analysis would uncover. For example, film yourself doing a single-leg squat. Does your knee collapse inwards (a condition called knee valgus)? This is a sign of weak gluteus medius muscles, and it directly correlates to an inability to maintain edge pressure on your corresponding ski, causing chatter and instability. Identifying and correcting a strength imbalance like this off-snow can lead to immediate and dramatic improvements in your turn symmetry and edge hold.
Use your phone’s slow-motion feature. Film yourself skiing from the side, from the front, and from behind. Compare what you see to videos of expert skiers. Are you truly in a forward stance, or are you sitting back? Are you angulating with your knees and hips, or just leaning your whole body? This DIY movement analysis is the ultimate “hack.” It makes the invisible visible and gives you concrete, personalized feedback that is far more valuable than any generic tip.
Your journey to advanced skiing is a process of un-learning bad habits and replacing them with a conscious understanding of technique. Begin today by applying these principles, one at a time, and start turning the intermediate plateau into your new base camp for exploring the entire mountain.