In summary:
- Blister prevention in wet conditions is not about staying dry, but managing skin maceration and friction.
- Biomechanics are key: proper pack loading, lacing techniques, and pole use directly reduce foot pressure.
- A systematic hourly foot care routine is non-negotiable to maintain skin integrity when feet are wet.
- Material science matters: synthetic liner socks wick moisture away from the skin, while wool outers insulate when damp.
- Preparation is crucial, including pre-trek skin toughening and heat acclimatization protocols.
For the long-distance trekker heading into the perpetually damp environments of Scotland or Patagonia, the conventional wisdom on foot care is dangerously insufficient. You are told to “keep your feet dry,” an impossible and frustrating goal when faced with constant rain, river crossings, and boggy terrain. The reality is your feet will be wet, not for an hour, but for days on end. This prolonged exposure leads to skin maceration—the softening, whitening, and breakdown of the epidermis, which dramatically increases the friction coefficient and makes your feet acutely vulnerable to devastating blisters.
Most advice focuses on reactive measures like applying tape to “hot spots.” By then, the damage has begun. This guide takes a different, medical-grade approach, born from experience in ultra-endurance events where wet feet are a given. We will not focus on the futile chase for dryness. Instead, we will build a robust system for maintaining skin integrity and managing biomechanical forces *while* your feet are compromised. The true key to finishing a multi-day wet trek is not preventing moisture, but mastering its consequences.
This article will deconstruct the problem from the ground up. We will analyze everything from the specific lacing techniques that prevent toe impact to the science of sock layering, the critical importance of load distribution in your pack, and the rigorous, non-negotiable foot care protocols required to keep your skin functional. This is not about comfort; it’s about medical prevention to ensure you can keep walking, day after relentless day.
This comprehensive guide details the essential strategies for protecting your feet in the most challenging wet conditions. The following sections break down each component of this systemic approach, providing actionable techniques and expert insights to keep you on the trail.
Summary: A Systemic Approach to Foot Care in Wet Conditions
- Why a simple knot change stops your toes from hitting the front on descents?
- Wool or Synthetic: Which prevents maceration when walking in river crossings?
- How to pack your bag so 70% of the weight sits on your hips, not shoulders?
- The technique mistake that makes trekking poles useless for knee relief
- What are the 3 steps to ensure water is virus-free in developing countries?
- Hard Shell or Soft Shell: Which is essential for variable alpine winds?
- How to keep your feet healthy when they are wet for 8 hours a day?
- How to Prepare for Jungle Trails Where Humidity and Terrain Are Relentless?
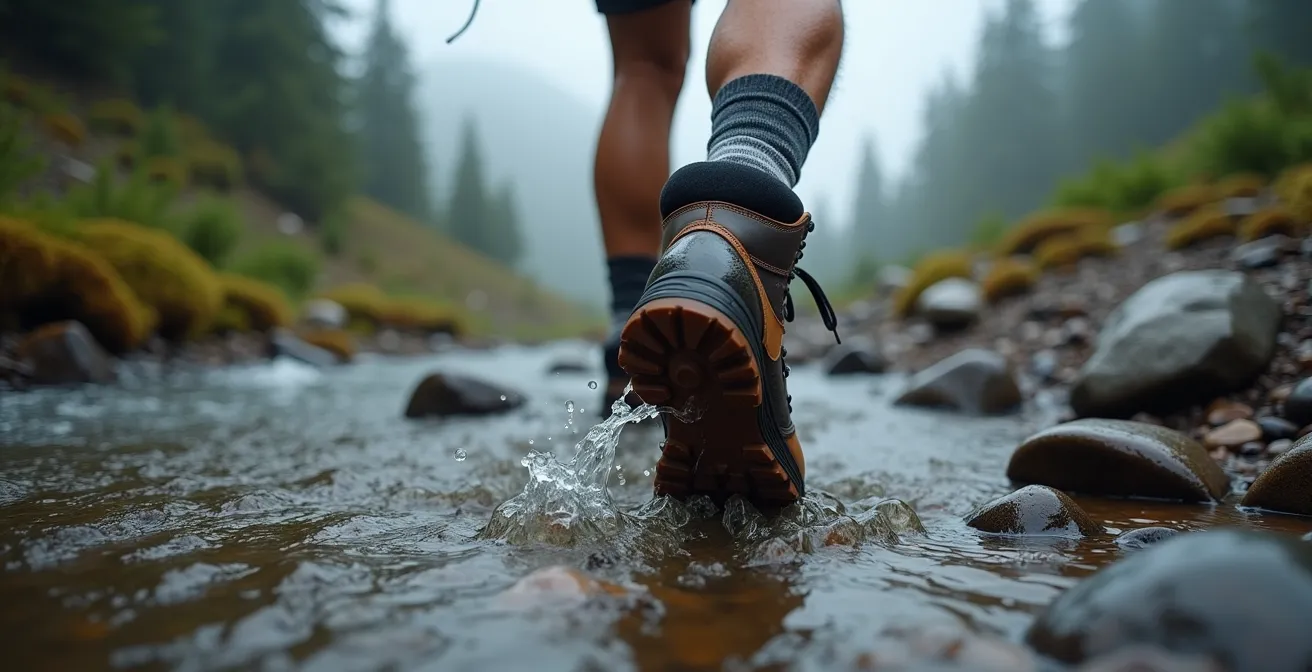
Why a simple knot change stops your toes from hitting the front on descents?
On a long, punishing descent, the force of gravity relentlessly pushes your foot forward inside your boot. Each step causes micro-trauma as your toes slam into the front of the toebox. When your feet are wet and the skin is macerated, this repeated impact doesn’t just cause bruising; it creates powerful shearing forces that delaminate the epidermal layers, forming deep, painful subungual hematomas (blood under the toenail) and blisters on the tips of your toes. While research shows that up to 95% of hikers experience blisters, many are preventable through simple biomechanical adjustments.
The solution lies not in tightening your entire boot, but in creating a specific “heel lock.” This is achieved using a surgeon’s knot or a locking lace technique at the ankle. By creating an anchor point just before the top two or three eyelets, you can secure your heel firmly in the back pocket of the boot. This prevents the forward slide without constricting blood flow to the rest of your foot, which is a common mistake that leads to swelling and other issues.
Here’s the technique: At the point where the top of your foot meets your ankle, loop the laces around each other twice before pulling them tight. This double-wrap creates enough friction to hold the tension below it, effectively isolating the forefoot from the ankle. You can then lace the upper hooks loosely for comfort. This single change in lacing transforms your boot from a loose container into a secure system that holds your foot in place, directly mitigating the primary mechanical cause of downhill foot trauma. It is one of the most effective, no-cost preventative measures an endurance walker can adopt.
Wool or Synthetic: Which prevents maceration when walking in river crossings?
When your feet are submerged, the question is no longer about wicking sweat, but about managing environmental water. The choice of sock material becomes a critical factor in mitigating maceration. A 2024 study of hikers provided clear clinical evidence, finding that 61.6% of those who developed blisters had higher foot hydration levels. This confirms that managing the skin’s moisture level, even when the environment is saturated, is paramount.
The answer is not one material, but a two-sock system. The layer directly against your skin should be a thin, snug-fitting synthetic liner sock (e.g., made of polypropylene or polyester). Synthetics do not absorb water; they actively push it away from the skin through hydrophobic action. This creates a micro-environment that is drier than the outer layer, significantly reducing the skin’s saturation and friction coefficient.
The outer layer should be a high-quality merino wool sock. Wool’s advantage is not that it stays dry—it doesn’t. Its critical property is that it can absorb up to 30% of its weight in water without feeling wet to the touch and, most importantly, it retains its insulating properties when damp. This prevents your feet from getting dangerously cold, which can restrict blood flow and impair healing. A synthetic outer sock, by contrast, would feel cold and clammy, losing all thermal value.

This system works in synergy: the synthetic liner manages moisture at the skin’s surface to fight maceration, while the wool outer sock provides a thermal buffer and structural cushioning, even when soaked. This combination directly addresses the two primary threats of wet conditions: compromised skin integrity and heat loss.
| Feature | Merino Wool | Synthetic |
|---|---|---|
| Moisture Wicking | Good | Excellent |
| Drying Time | Slower (2-4 hours) | Fast (30-60 minutes) |
| Odor Control | Excellent | Poor to moderate |
| Insulation When Wet | Maintains warmth | Loses insulation |
| Durability | Moderate | High |
How to pack your bag so 70% of the weight sits on your hips, not shoulders?
Blisters don’t always start on the feet; they can be a direct symptom of poor systemic load management. When a backpack’s weight hangs from your shoulders, it alters your entire gait. You lean forward to compensate, increasing pressure on your forefoot and toes. This constant, unnatural pressure creates friction and shearing forces inside your boots. The goal is to transform your pack from a burden on your back into a load that is efficiently transferred to your body’s strongest structural element: the pelvic girdle.
The key is ensuring the majority of the pack’s weight is carried by the hip belt, which must be positioned correctly on your iliac crest—the top ridge of your hip bones. It should not be on your waist or soft tissue. When fitted properly, your powerful leg and core muscles bear the load, freeing your shoulders and spine and promoting a more natural, upright posture. This directly reduces the downward pressure and forward-shifting forces on your feet.
As the CleverHiker Technical Team states in their gear guide:
A properly fitted pack transfers the majority of weight to your hips through the hip belt, which should rest on your iliac crest. This reduces metabolic cost and preserves shoulder and back health for multi-day treks.
– CleverHiker Technical Team, CleverHiker Gear Guide
Proper packing is as crucial as proper fitting. Heavy items like water, food, and cooking gear must be placed close to your spine and in the middle of your back. This keeps the center of gravity high and tight against your body, preventing the pack from pulling you backward and causing you to lean forward. Lighter, bulkier items like sleeping bags and clothing should fill the spaces at the bottom and top.
Your Action Plan: Core-Centric Packing for Hip Loading
- Place your sleeping bag and other bulky, light items at the bottom of the pack to create a stable base.
- Position the heaviest items (water reservoir, food, cook set) against your spine in the middle to upper third of the pack.
- Fill the surrounding space with medium-weight items like clothing layers, keeping dense gear close to your back and lighter gear toward the outside.
- Once packed, position the hip belt so it cups the top of your iliac crest (hip bones) and tighten it first, so it takes the weight.
- Snug the shoulder straps so they contour to your shoulders but do not carry the primary load; you should be able to slide a finger underneath.
- Finally, adjust the load lifter straps (above the shoulders) to a 45-degree angle to pull the pack’s weight toward your body and prevent it from sagging.
The technique mistake that makes trekking poles useless for knee relief
Trekking poles are often promoted for knee relief on descents, but a common technique error negates their benefit and can even increase instability. Many hikers use poles passively, planting them vertically like a third leg for balance. This does little to dissipate the heavy impact forces that travel from the ground, through the foot, and up to the knee. To be effective, poles must be used as an active braking and propulsion system, engaging your upper body to offload the strain from your lower limbs.
The most critical mistake is a passive plant and a bent-arm posture. When you plant the pole with a significantly bent elbow, your arm acts as a shock absorber, but the force is contained within your own body. To truly offload your knees, you need to use a straighter arm and engage your larger back muscles (latissimus dorsi) and triceps. The pole should be planted ahead of you on descents, and you should “lean into it” with a relatively straight arm, allowing the pole to absorb a significant portion of your body weight before your foot even makes full contact with the ground.
Correct technique involves a rhythmic, coordinated movement that integrates your entire body. Here are the core principles:
- Adjust Pole Length: Shorten poles for uphill sections and lengthen them for downhills. On descents, the pole handle should be at or slightly below chest height when planted, allowing for a straighter arm.
- Use the Straps Correctly: Your hand should come up through the bottom of the strap and grip the handle. The strap, not your grip, should take the majority of the weight. This prevents hand fatigue and allows for a more powerful push.
- Engage Your Core and Lats: The movement should originate from your core and back. Think of actively pulling the trail towards you on ascents and pushing your body away from the ground on descents. It’s a full-body workout, not just an arm exercise.
- Opposite Arm-Leg Rhythm: Just like walking, your left pole should move forward with your right foot, and your right pole with your left foot. This maintains balance and creates a fluid, efficient gait.
By transforming your pole use from a passive balancing act to an active load-bearing technique, you can reduce the cumulative impact on your knees and feet by tons over the course of a day. This conserves energy and, crucially, reduces the jarring impacts that contribute to foot fatigue and blisters.
What are the 3 steps to ensure water is virus-free in developing countries?
While blisters are a primary concern, a systemic illness from contaminated water can end a trek far more definitively. In many parts of the world, especially developing countries, water sources can be contaminated not just with bacteria (like E. coli) and protozoa (like Giardia and Cryptosporidium), but also with much smaller viruses (like Hepatitis A and Norovirus). Standard backpacking filters are often not sufficient, as their pore size may not be small enough to remove viruses. As medical research found that 56% of long-distance hikers experienced diarrhea, a multi-barrier approach to water purification is a medical necessity, not an option.
A comprehensive system involves three distinct stages: filtration, purification, and hygiene. Relying on a single method creates a potential point of failure.
- Step 1: Mechanical Filtration. The first step is to remove sediment, bacteria, and protozoa. This is best done with a hollow-fiber filter (like a Sawyer Squeeze or Katadyn BeFree) with a pore size of 0.1 or 0.2 microns. This makes the water clear and removes the larger pathogens, which is crucial because chemical purifiers are less effective in murky or turbid water. This step is your defense against Giardia and Crypto.
- Step 2: Chemical or UV Purification. This is the critical step for eliminating viruses. After filtering, the water must be treated again. You have two primary options:
- Chemical Treatment: Use chlorine dioxide tablets or drops. They are lightweight, effective against viruses, and have a better taste profile than iodine. However, they require a contact time of 15 minutes to 4 hours, depending on water temperature and the specific product.
- UV Light: A UV purifier (like a SteriPEN) uses ultraviolet light to destroy the DNA of viruses, bacteria, and protozoa. It’s fast (about 90 seconds for a liter) but relies on batteries and can be less effective in cloudy water. It’s an excellent method for water that has already been filtered clear.
- Step 3: Rigorous Hygiene. Pathogens are often transferred via hand-to-mouth contact. A perfectly purified water bottle can be instantly contaminated by dirty hands. Carry a small bottle of alcohol-based hand sanitizer and use it religiously after using the toilet and before handling your water bottles, cooking, or eating.
Case Study: The Multiplier Effect of Poor Hygiene
A landmark study of Appalachian Trail backpackers revealed the stark reality of waterborne illness risks. Researchers found that hikers who frequently drank untreated water had a 7.7 times higher risk of developing diarrhea. Critically, the same study showed that simply practicing good hygiene (like hand washing) independently reduced the risk by 54%. This highlights that purification and hygiene are two separate but equally vital pillars of backcountry health. Relying on just one is a significant gamble.
Hard Shell or Soft Shell: Which is essential for variable alpine winds?
In variable alpine conditions, where you might experience intense sun, sudden biting wind, and then a cold shower in the span of an hour, your outerwear system is key to thermoregulation. The debate between a hard shell and a soft shell is not about choosing one over the other; it’s about understanding their specific roles in managing moisture from both inside (sweat) and outside (rain and wind).
A hard shell is your emergency layer. It is fully waterproof and windproof, designed to protect you from the worst possible weather. Its primary drawback is a relative lack of breathability. When you are working hard climbing a steep slope, even the most advanced hard shell membranes can’t transport moisture vapor fast enough, leading to a build-up of sweat on the inside. Wearing a hard shell when it’s not raining is a common mistake that leaves you just as wet from your own perspiration.
A soft shell, conversely, is your workhorse layer. It is highly breathable, water-resistant (not waterproof), and wind-resistant. It’s designed to be worn during active use. It blocks most wind and sheds light rain or snow while allowing the massive amount of moisture your body produces to escape. For 90% of your time on a trek with variable weather, a soft shell provides the ideal balance of protection and breathability, keeping you dry from the inside out and preventing the chill that comes from sweat-soaked base layers.
The correct strategy for alpine environments is to use a hybrid system. You wear the breathable soft shell jacket for the majority of the day, managing your temperature by zipping and unzipping. The ultralight hard shell stays in your pack, ready to be deployed instantly when a true downpour starts or when extreme, sustained winds threaten to strip your body of heat. This combination ensures you are never “over-shelled” and sweating out, nor “under-shelled” and exposed to the elements.
| Condition | Hard Shell | Soft Shell |
|---|---|---|
| Wind Protection (>40mph) | Excellent (100%) | Good (80-90%) |
| Breathability (MVTR) | Low-Moderate (5,000-15,000 g/m²/24hr) | High (20,000-30,000 g/m²/24hr) |
| Weight | Light (8-12 oz) | Moderate (12-20 oz) |
| Rain Protection | Waterproof | Water-resistant only |
| Activity Level Suitability | Low to moderate | Moderate to high |
How to keep your feet healthy when they are wet for 8 hours a day?
When your feet are saturated for an entire day of walking, you must shift from a mindset of prevention to one of active, disciplined management. The goal is to interrupt the process of maceration and check for damage before it becomes irreversible. This requires a systematic, hourly protocol. Letting your feet stew in wet socks for hours is a direct path to trench foot and debilitating blisters. In fact, research shows the majority of blisters occur on Day 2 of multi-day hikes, precisely when the cumulative effect of moisture begins to break down the skin.
Your mantra should be: “Every hour, on the hour.” At every 60-minute interval, you must stop, even if only for five minutes. This brief pause is the most important investment you can make in your trek’s success. During this stop, you will perform a clinical check-in on your feet. The process is non-negotiable:
- Remove Boots and Socks: This immediately exposes your skin to air, which is the first step in combating maceration.
- Dry Your Feet: Use a dedicated, small microfiber towel (which dries quickly) to thoroughly dry your feet, paying special attention to the skin between your toes.
- Apply Foot Powder: Liberally apply a foot powder with antifungal properties. This does two things: it absorbs any residual moisture and it dramatically reduces the friction coefficient between your skin and the sock.
- Inspect for Hot Spots: Carefully examine your entire foot for any areas of redness or tenderness. Check between toes for debris or early signs of skin breakdown. If you find a hot spot, this is the time to apply a blister prevention tape or dressing, *before* a blister forms.
- Rotate Socks: If your socks are saturated, swap them for the driest pair you have. Hang the wet pair on the outside of your pack to air dry as you walk. Even if they don’t dry completely, they will be drier than the ones you were just wearing.
At the end of the day, the routine is even more critical. Your feet must be cleaned, dried completely, and allowed to air out for as long as possible. Applying an antifungal cream and elevating your feet while you sleep can help reduce inflammation and fluid buildup. This rigorous, disciplined approach is what separates those who finish the trek from those who are forced to stop by foot-related injuries.
Key Takeaways
- The primary goal in wet conditions is not staying dry, but managing skin maceration through systematic care.
- Biomechanics are a form of blister prevention; correct lacing, pack loading, and pole use directly reduce foot stress.
- A two-sock system (synthetic liner, wool outer) is the most effective way to manage moisture and temperature at the skin’s surface.
How to Prepare for Jungle Trails Where Humidity and Terrain Are Relentless?
Preparing for a jungle trek, where extreme humidity is as much a challenge as the terrain itself, requires conditioning your body and skin long before you step onto the trail. In this environment, your feet will be constantly wet from sweat, humidity, and frequent water crossings. Your body’s cooling system will be pushed to its limits. Proactive acclimatization and skin toughening are not optional; they are fundamental to success.
The first component is heat acclimatization. Your body needs to learn to sweat more efficiently—producing more sweat, with a lower salt concentration, to cool you more effectively. This physiological adaptation can be triggered through training. For several weeks leading up to your trek, you need to simulate the hot, humid conditions you will face. This trains your cardiovascular system and sweat response, reducing the overall stress on your body once you’re on the trail.
The second component is skin conditioning. The skin on your feet needs to be tough, but not dry and cracked. A common pre-expedition technique among ultra-runners and military personnel is to toughen the epidermis to make it more resistant to friction and moisture. This creates a more resilient outer layer that is less prone to the rapid breakdown of maceration.
A structured pre-trek protocol should look like this:
- Weeks 4-3 Before Trek: Begin daily application of a skin-toughening agent. Applying rubbing alcohol with a cotton ball to the soles of your feet each evening can help dry and harden the outer epidermal layer. Start a heat acclimatization protocol by exercising in heavier clothing for 30-45 minutes to induce heavy sweating.
- Weeks 2-1 Before Trek: Increase the intensity of your heat training. Add sauna sessions or exercise in a hot room (if available) 3-4 times per week after your regular workouts. Continue skin toughening. This is also the time to conduct your training hikes with a fully loaded pack to simulate the biomechanical stress of the trek.
- Final Week: Taper your training but continue with short heat exposure sessions to maintain your acclimatization. Stop using rubbing alcohol 2-3 days before the trek to allow the skin to rehydrate slightly, leaving it tough but pliable. Ensure all your clothing and gear are quick-drying, non-cotton materials.
This conditioning process builds resilience into your system. By arriving on day one with feet that are already toughened and a body that is already adapted to the heat, you have built a significant buffer against the relentless environmental stress of the jungle.
By adopting this comprehensive, medical-grade approach—from pre-trek conditioning to in-field biomechanics and hourly skin care—you can shift your focus from a futile battle against wetness to a successful strategy of managing its effects. The next step is to integrate this system into your own gear and preparation plan for your next major endurance walk.