The key to unlocking pro-level performance isn’t raw talent, but adopting a systematic approach to de-risking every aspect of your riding.
- Pros use cognitive rehearsal to eliminate hesitation, tactile inspection to pre-empt gear failure, and targeted physiology to build an endurance engine.
- This framework transforms risk from a matter of luck into a manageable variable you can control.
Recommendation: Begin by implementing one system: the ‘Commitment Point Protocol’ for your jumps to build the foundational mental discipline.
For any dedicated amateur kitesurfer, hitting a performance plateau is a familiar frustration. You’ve mastered the basics, you’re staying upwind, but pushing into bigger jumps and more technical tricks feels like a dangerous lottery. The common advice often feels generic: “check your gear,” “commit to your jumps,” “get stronger.” While true, these platitudes miss the crucial detail: the pros don’t just do these things; they have engineered systems around them. They don’t just hope for the best; they methodically eliminate uncertainty before they even hit the water.
The difference between a confident pro and a hesitant amateur isn’t a lack of fear. It’s the presence of a process. This isn’t about reckless abandon; it’s about a deep, analytical approach to every facet of the sport. We’ve spoken with professional riders and coaches to deconstruct their methods, and the recurring theme is one of a systematic mindset. This mindset transforms kitesurfing from a reactive sport into a proactive discipline.
But what if the real secret to boosting higher and crashing less wasn’t about simply trying harder, but about adopting the mental models and physical protocols of the elite? This guide moves beyond the what and dives into the how and why. We will explore the specific systems pros use for managing jump commitment, inspecting gear to prevent failure, choosing the right equipment for progression, and building the specific physical strength that underpins it all. By understanding these professional frameworks, you can build your own path to safer, more consistent progression.
This article deconstructs the key pillars of the professional kitesurfer’s approach. Each section provides a specific, actionable insight that you can integrate into your own riding, moving you from hopeful amateur to systematic performer.
Summary: Hacking Pro-Level Kitesurfing Through Systematic Risk Management
- Why Hesitating Mid-Jump Causes 90% of Heavy Crashes?
- How to Inspect Your Lines Like a Pro to Prevent Mid-Air Snaps?
- C-Kite or Bow Kite: Which Shape Accelerates Learning Unhooked Tricks?
- The Physical Weakness That Limits Your Session Time to Under an Hour
- How to Read Water Texture to Predict a Gust 30 Seconds Before It Hits?
- How to Fix the One Running Gait Flaw That Causes Your Knee Pain?
- Why Time Seems to Slow Down When You Are in Physical Danger?
- How Can Amateurs Use Pro Performance Centers to Hack Their Fitness?
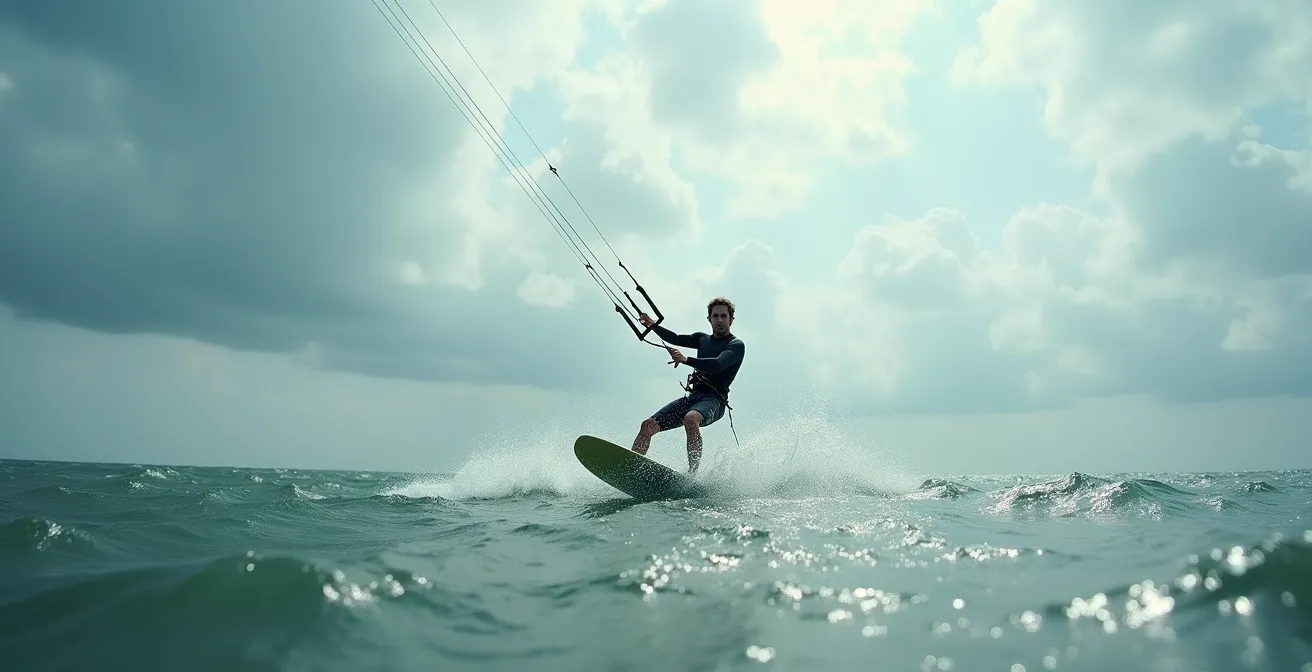
Why Hesitating Mid-Jump Causes 90% of Heavy Crashes?
The moment of truth for any jump isn’t at the apex, but in the split-second before takeoff. This is where the majority of serious accidents are born. Hesitation—a momentary flicker of doubt that causes a rider to back off the kite’s power or slightly alter their edge—is the root cause. When you hesitate, you disrupt the kite’s loading and lift sequence, often leading to an uncontrolled pendulum swing or a loss of line tension. This isn’t just an anecdotal observation; while the sport has become safer, research from the North Sea reveals 7.0 injuries per 1,000 hours of kitesurfing, many of which are linked to loss of control during aerial maneuvers. Pros understand that a fully committed, albeit failed, attempt is almost always safer than a half-hearted one.
The solution is not to “be more brave,” but to implement a system of Systematic De-risking through mental preparation. Pros don’t leave commitment to chance; they train it like a muscle. They establish a clear Commitment Threshold, a pre-defined point in the power build-up where the decision to “go” is irreversible. This removes in-the-moment doubt and replaces it with an automatic response pattern. By pre-programming the entire maneuver, including a safe exit strategy (the bail-out), the brain can execute the sequence without being paralyzed by real-time decision-making. This turns a high-stress moment into a rehearsed procedure.
Action Plan: The Commitment Point Protocol
- Pre-visualize: Before even sending the kite, visualize the entire maneuver sequence, from the initial carve to the final landing.
- Establish a Go/No-Go Point: Define a clear decision point, such as when the kite passes 11 or 1 o’clock and you feel 75% power buildup. Beyond this point, you are fully committed.
- Practice Bailing Out: On the beach with no kite, practice the physical motion of releasing the bar and initiating your safety release. This builds muscle memory for your escape plan.
- Train for Release: In light wind sessions, intentionally practice releasing the bar at the apex of small jumps to get comfortable with depowering and recovering.
- Build Automatic Responses: Develop these automatic response patterns through endless repetition in controlled, low-consequence conditions until they are second nature.
For the amateur, this means shifting focus from the jump’s height to the quality of the commitment. A perfectly executed, fully committed small jump is a far more valuable training exercise than a hesitant, uncontrolled big one.
How to Inspect Your Lines Like a Pro to Prevent Mid-Air Snaps?
A common platitude is “check your gear.” For an amateur, this often means a quick visual glance. For a pro, it’s a systematic, multi-sensory audit. A line snapping mid-air is one of the most catastrophic equipment failures, yet it’s often preventable. Visual inspection alone is notoriously unreliable; UV degradation, internal salt crystallization, and minor abrasions that weaken a line’s core are often invisible to the naked eye. Professionals rely on a tactile process to detect what their eyes cannot see.
This method involves stretching your lines between two anchor points and running your fingers along the entire length under tension. You’re feeling for subtle changes in diameter, stiffness, or texture. A small, hard spot can indicate internal salt buildup, while a slightly fuzzy or thin section signals abrasion and weakness. This tactile tension test provides direct feedback on the line’s structural integrity.
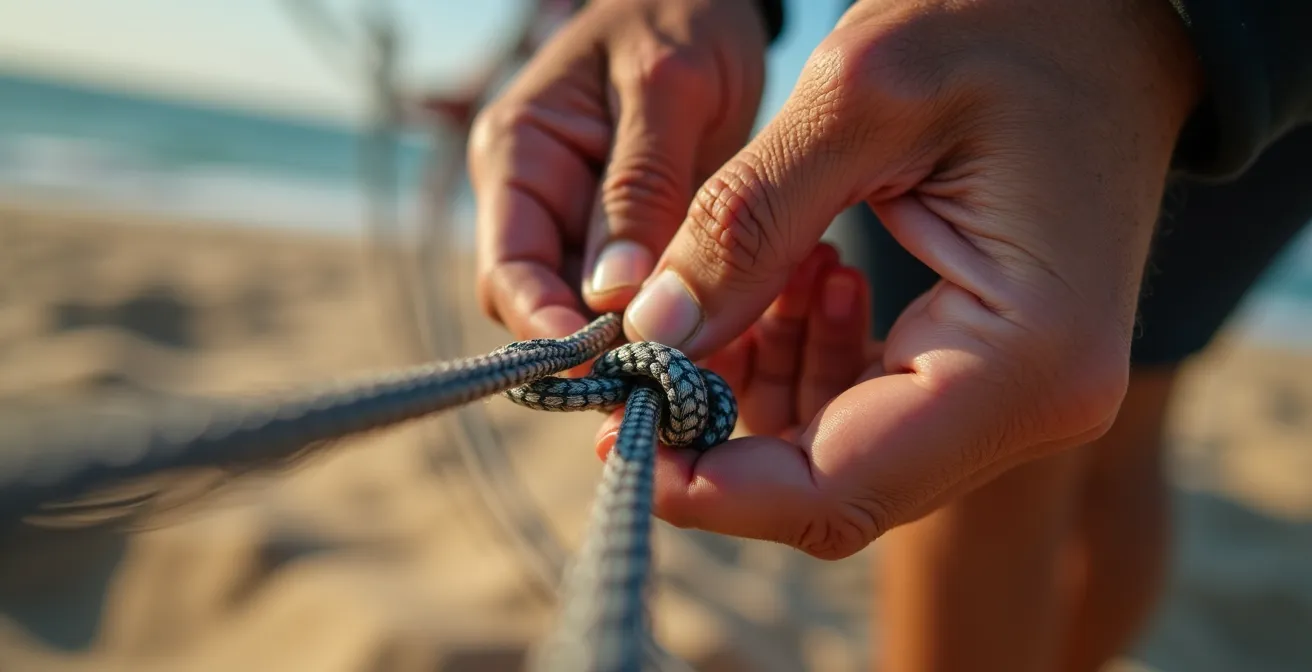
As the image demonstrates, this is a focused, deliberate process. It’s not a quick check; it’s a diagnostic procedure. The goal is to find the weak point before it finds you. Pros couple this physical check with a rigorous tracking system, logging the hours of use on each set of lines to replace them based on a calculated service life, not just after a visible failure.
Case Study: Professional Line Failure Prevention
An analysis of pro safety protocols revealed a stark difference in outcomes. According to a comprehensive safety protocol analysis, riders implementing a “service life tracking system” combined with regular tactile tension testing experienced zero line failures over a full season. In contrast, recreational riders relying solely on visual inspection experienced catastrophic failures at critical moments, confirming that what you can’t see can indeed hurt you.
The key takeaway for the amateur is to shift from passive looking to active feeling. Make the tactile line check a non-negotiable part of your pre-session ritual. It might be the most important five minutes you spend on the beach.
C-Kite or Bow Kite: Which Shape Accelerates Learning Unhooked Tricks?
Equipment choice is a strategic decision, not a matter of brand loyalty. When it comes to learning unhooked tricks, the debate between C-kites and Bow kites is central. While pros are often seen on aggressive C-kites, they didn’t necessarily learn on them. The choice of kite shape directly impacts the learning curve and safety margin. C-kites are designed for one thing: explosive pop and slack. This “slack” is a momentary loss of line tension after popping off the water, giving the rider a window to perform a handle-pass. However, this performance comes with a narrow depower range and a smaller margin for error.
Bow kites, or their hybrid cousins, are far more forgiving. They offer a massive depower range, meaning you can instantly kill the kite’s power by letting go of the bar. They are also much easier to relaunch from the water. While they don’t generate the same instantaneous slack as a C-kite, modern hybrid designs provide enough of a window for learning the fundamental movements of unhooking. This makes them the ideal platform for building muscle memory without the high consequences of a C-kite mistake.
The following table breaks down the key performance trade-offs, making it clear why starting on a more forgiving kite is the pro-approved pathway.
| Feature | C-Kite | Bow Kite | Best For |
|---|---|---|---|
| Slack Generation | Excellent (instant) | Moderate (delayed) | Advanced unhooking |
| Depower Range | Limited (20%) | Extensive (80%) | Variable conditions |
| Safety Margin | Low | High | Learning phase |
| Bar Pressure | Heavy | Light to moderate | Feedback sensitivity |
| Relaunch Ease | Difficult | Easy | Beginner friendly |
This data highlights a core principle of professional progression: master the mechanics in a low-risk environment first. As leading instructors emphasize, the foundation is everything.
Start learning the foundations of unhooking on a forgiving Bow/Hybrid kite to manage risk, before graduating to a C-kite for peak performance slack.
– Professional kitesurfing instructors, IKO Training Guidelines
The lesson for the ambitious amateur is to resist the temptation to buy the “pro model” kite immediately. Choose the tool that best accelerates learning and minimizes risk for your current skill level. You graduate to the C-kite once the movements are automatic, not to learn them from scratch.
The Physical Weakness That Limits Your Session Time to Under an Hour
You may think your session is ending because your arms are tired or the wind is dying. In reality, it’s often because your physiological engine has run out of fuel. For most kitesurfers, the limiting factor isn’t arm strength or even core stability; it’s a weak posterior chain. The posterior chain is the group of muscles on the back of your body—glutes, hamstrings, and lower back. This is the powerhouse that allows you to resist the kite’s pull, hold a strong edge, and generate the power for jumps. When these muscles fatigue, your body compensates by over-relying on your quads and lower back, leading to poor form, loss of power, and a rapid end to your session.
Professionals don’t just “go to the gym.” They train with a specific focus on building a powerful and resilient posterior chain. Their off-water training is designed to directly support their on-water performance. Exercises like kettlebell swings, hip thrusts, and single-leg deadlifts are staples because they build explosive power and endurance in the exact muscles needed to stay on the water for hours, not minutes. This targeted approach ensures that their primary power source is the last thing to fatigue.
Integrating these exercises into your routine can dramatically extend your session time and improve your ability to hold down power. It’s about building a body that’s not just fit, but functionally engineered for the unique demands of kitesurfing.
Action Plan: The Posterior Chain Strengthening Protocol
- Kettlebell Swings: 3 sets of 20 reps, focusing on explosive hip drive, not using your arms to lift the weight.
- Hip Thrusts: 3 sets of 15 reps with a 3-second hold at the peak of the contraction to maximize glute activation.
- Single-leg Romanian Deadlifts: 2 sets of 12 reps on each leg to correct asymmetries and improve balance.
- Bulgarian Split Squats: 3 sets of 10 reps on each leg, emphasizing glute engagement on the front leg.
- HIIT Intervals: Incorporate explosive effort like sprints or box jumps for 30 seconds, followed by 90 seconds of recovery, repeated 8 times to build metabolic endurance.
The insight for the amateur is profound: your time on the water is often determined by the work you do off the water. Stop training like a generalist and start training like a specialist, with a laser focus on your posterior chain.
How to Read Water Texture to Predict a Gust 30 Seconds Before It Hits?
“Watch the weather” is beginner advice. Professionals practice Environmental Literacy—they actively read the water’s surface to predict changes in wind strength and direction. The water ahead of you is a real-time map of the wind. A dark, advancing line of rough water is a clear signal of an approaching gust. By constantly scanning the horizon, a pro can spot a gust 30, 60, or even 90 seconds before it arrives, giving them ample time to prepare. They can edge harder to load up for a massive jump or depower their kite and brace for impact.
This isn’t a mystical art; it’s a learned skill of pattern recognition. The key is to look for transitions in the water’s texture. Calm patches will appear glassy, light winds create small ripples, and strong gusts create a dark, turbulent texture often accompanied by whitecaps. By identifying these zones and tracking their speed across the water, you can make strategic decisions instead of being a passive victim of the conditions.
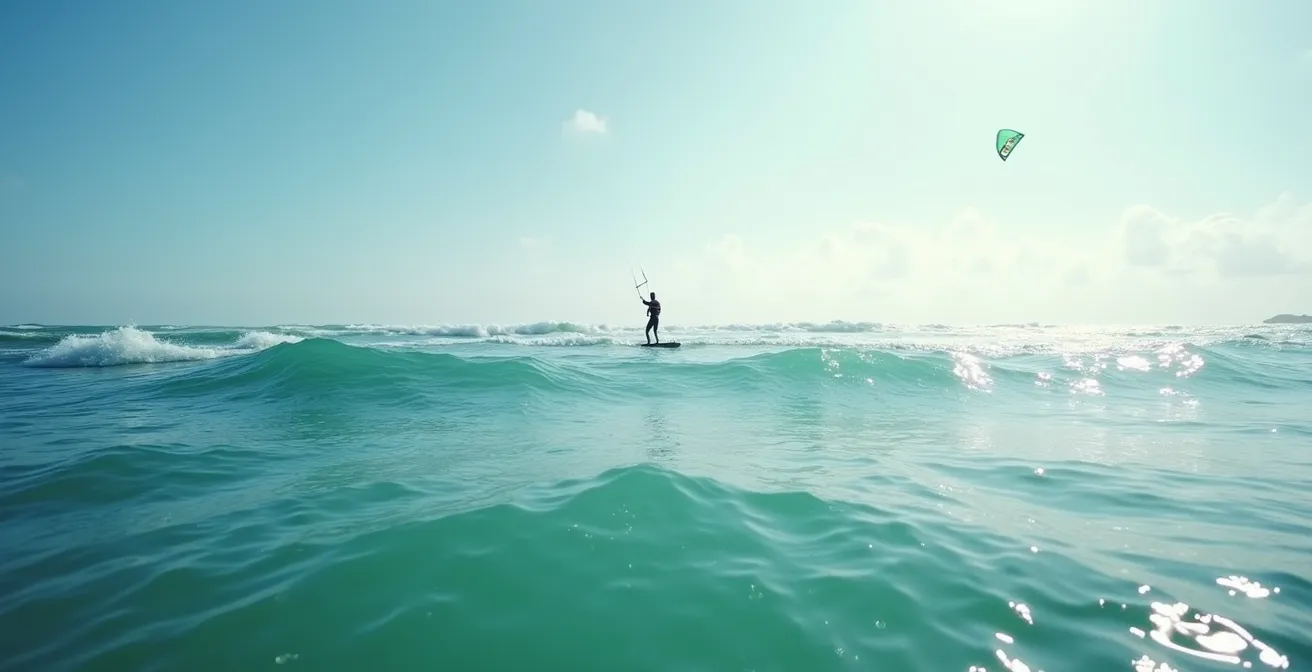
As this wide view shows, the ocean is rarely uniform. It’s a patchwork of different wind strengths. The skill lies in interpreting this visual data. A pro is constantly scanning 180 degrees, from upwind to downwind, creating a mental model of the immediate wind field. They aren’t just looking at their kite; they are reading the entire arena. This constant situational awareness is a hallmark of an expert rider and a critical component of both safety and high performance.
For the amateur, the lesson is to lift your gaze. Stop focusing exclusively on your board and kite and start dedicating 20% of your mental bandwidth to scanning the horizon. Turn the water’s surface into your personal wind forecast.
How to Fix the One Running Gait Flaw That Causes Your Knee Pain?
While the title mentions a “running gait flaw,” in kitesurfing, the most common source of knee pain comes from a “landing gait flaw.” Many amateurs land jumps with their legs too straight or with their weight too far back, sending a jarring impact directly through the knee joint. This is often a result of fear or a lack of body awareness, where the rider instinctively straightens their legs to “find” the water. Over time, this repetitive impact leads to chronic pain and inflammation, cutting seasons short.
Pros, on the other hand, treat landings as an active, not a passive, event. They fix this flaw by drilling a mid-foot strike landing protocol. They aim to land with their knees bent and their center of gravity stacked directly over their board. This allows the major muscle groups of the legs—the quads and glutes—to act as powerful shock absorbers, dissipating the force of the landing and protecting the joints. This requires pre-emptive muscle engagement; they are already tensing their leg muscles half a second before touchdown, preparing them to absorb the load.
This technique transforms a high-impact collision into a controlled absorption of energy. It’s a fundamental skill that not only prevents injury but also allows for a smoother transition from landing back into riding, maintaining speed and control.
Action Plan: The Mid-Foot Strike Landing Protocol
- Land Bent: Practice landing with deeply bent knees, keeping your center of gravity directly over the board.
- Engage Pre-emptively: Consciously tense your quads and glutes just before touchdown to prepare for the impact.
- High-Cadence Steps: Use short, quick “edging steps” on the water during your approach to a jump to maintain a dynamic, ready posture.
- Visualize Landing Beneath You: Mentally picture your landing zone as being directly under your hips, not out in front of you.
- Drill on a Trampoline: Practice jumping on a trampoline, focusing on landing on your mid-foot with flexed joints to build the motor pattern without the risk.
The amateur’s goal should be to make every landing feel like landing on a pillow, not a pavement. This is achieved by using your muscles as the suspension they were designed to be.
Why Time Seems to Slow Down When You Are in Physical Danger?
It’s a common phenomenon in extreme situations: during a crash or a moment of intense fear, time seems to stretch, and events unfold in slow motion. This is a neurological effect known as tachypsychia, or “time dilation.” When faced with a threat, the amygdala in your brain triggers a flood of adrenaline, heightening your sensory input. Your brain is essentially taking in more “frames per second,” which, in retrospect, makes the event feel as though it lasted longer. For an untrained amateur, this experience can be disorienting and lead to panic and freezing.
For professionals, however, this effect is a weapon. Through intense and repeated exposure to high-stress situations, they have learned to operate within this state of heightened perception. They don’t panic; they achieve a state of hyper-focus. This perceived “extra time” gives them a larger window to analyze the situation, cycle through their options, and execute the correct procedure. This is where Cognitive Rehearsal becomes a superpower.
Pros, through high-stress training, learn to weaponize this ‘time dilation’ effect, transforming it from disorienting panic into a hyper-focused state.
– Sports Psychology Research, Extreme Sports Mental Training Studies
By mentally rehearsing “If-Then” scenarios over and over (“If my lines tangle, Then I pull my primary safety”), they have pre-loaded their brains with the correct responses. When a crisis hits and time slows down, they don’t have to think; they simply execute the pre-programmed script.
Case Study: If-Then Cognitive Rehearsal in Emergencies
Analysis of professional kitesurfer responses during equipment failures showed a dramatic difference. Those who had pre-programmed ‘If-Then’ emergency protocols through mental rehearsal were able to execute the correct safety procedures within 2 seconds. This is in stark contrast to the 8-12 seconds it took for riders relying on real-time decision-making. This mental training effectively converted chaotic crisis moments into controlled, manageable procedures.
The lesson for amateurs is to start building your own “If-Then” library. Pick three common failure scenarios (e.g., tangled lines, inverted kite, snapped line) and rehearse your exact response until it becomes an automatic reaction.
Key Takeaways
- Hesitation, not height, is the primary cause of severe crashes. Full commitment is a safety feature.
- Gear safety relies on systematic, tactile inspection to find weaknesses before they become failures. A visual check is not enough.
- Physical conditioning for kitesurfing is about building a powerful posterior chain engine, which is the true source of endurance and power on the water.
How Can Amateurs Use Pro Performance Centers to Hack Their Fitness?
Professional athletes have access to performance centers where they use force plates, 3D motion capture, and VO2 max testing to find and fix the smallest inefficiencies in their bodies. For an amateur, this level of analysis seems out of reach. However, the *principles* behind this testing can be applied with low-cost tools to achieve significant gains. The goal of pro testing is to identify two key things: asymmetry (imbalances in strength or mobility between the left and right sides of the body) and metabolic inefficiency.
An amateur can create a “DIY performance audit” using just a smartphone and a heart rate monitor. For example, filming yourself from behind while edging hard on both tacks can reveal obvious differences in hip rotation or body posture. A simple single-leg box jump test, measuring the maximum height you can reach on each leg, is a surprisingly accurate proxy for power asymmetry. These imbalances are performance killers; a weaker side will always be the first to fatigue and fail, limiting your ability to progress in one direction.
While DIY methods are not as precise as a professional lab, they are more than sufficient to identify major imbalances that can be targeted with corrective exercises. The table below shows how surprisingly close you can get to pro-level analysis with simple tools.
As this comparative analysis shows, home testing can provide highly valuable directional data.
| Assessment | Pro Center Method | DIY Alternative | Accuracy |
|---|---|---|---|
| Power Output | Force Plates | Box Jump + Slow-mo Video | 85% |
| Asymmetry | 3D Motion Capture | Smartphone Video Analysis | 70% |
| Metabolic Zones | VO2 Max Testing | Heart Rate Monitor | 90% |
| Muscle Imbalance | Isokinetic Testing | Single-leg Exercises | 75% |
Action Plan: DIY Asymmetry Audit
- Film Your Tacks: Have a friend film you from behind while you are edging hard on both your natural and switch stance. Look for differences in hip and shoulder alignment.
- Test Single-Leg Balance: Stand on one foot with your eyes closed and time how long you can hold it. Test both sides and note the difference. Aim for 60 seconds.
- Measure Single-Leg Jumps: Measure your maximum single-leg box jump height for each leg to quantify power imbalances.
- Track Your Heart Rate: Use a heart rate monitor during a session to identify your effort zones. Note how quickly your heart rate spikes when riding on your weaker side.
- Design Corrective Work: Use this data to design a corrective exercise program, adding extra sets of exercises like single-leg Romanian deadlifts or Bulgarian split squats for your weaker side.
The final takeaway is to stop guessing about your fitness. Start today by applying the DIY Asymmetry Audit to identify and address your first, most significant performance bottleneck.
Frequently Asked Questions About Pro Kitesurfing Techniques
What does a ‘glassy slick’ indicate?
A glassy, mirror-like surface on the water indicates an approaching lull or wind shadow. This is a signal that you are about to lose power, requiring immediate kite repositioning (like sending it through a loop or downloop) to maintain tension and control.
How to identify a dangerous squall?
A dangerous squall is visually distinct. Look for a patch of water that appears to be boiling with a white, frothy texture and visible spray being lifted off the surface. This indicates wind speeds that likely exceed the safe limits of your kite, and you should immediately depower, head to shore, and prepare to use your emergency safety systems.
What’s the optimal scanning pattern?
The optimal pattern is a systematic 180-degree horizon scan performed every 20-30 seconds. This involves sweeping your eyes from far upwind to far downwind, constantly tracking the movement, speed, and direction of different water textures to calculate their arrival time and prepare accordingly.