
For the stiff runner, nagging injuries often stem from a misunderstanding of mobility. Endless dynamic stretching provides only temporary relief because it fails to address the deep, restrictive connective tissue (fascia). Hatha yoga offers a superior solution. By using long, static holds, it initiates a physiological change in the fascia itself, building genuine, lasting resilience. This practice is not just about flexibility; it’s a systematic method for re-engineering your body’s structural integrity and nervous system for a sustainable running career.
If you’re a runner, you’ve likely been told that your tight hamstrings are a ticking time bomb. The common advice is a frustrating cycle: stretch more, foam roll, and maybe cut back on mileage. You follow the rules, performing dynamic leg swings and quick pre-run stretches, yet the stiffness persists, and the threat of IT band syndrome, plantar fasciitis, or lower back pain always looms. This approach often fails because it only skims the surface of a much deeper issue.
The problem isn’t a lack of stretching, but the *type* of stimulus your tissues receive. Your body’s resilience is governed by a web of connective tissue called fascia. Quick, bouncing stretches do little to change this resilient matrix. They provide a fleeting sensation of release but don’t create lasting structural adaptation. But what if the key wasn’t more movement, but more stillness? What if holding a position, with precise alignment and breath, could fundamentally retrain your tissues and nervous system to be more durable?
This is the core principle of Hatha yoga as a tool for athletic performance. It moves beyond simple flexibility to offer a methodical approach to injury prevention. This article will deconstruct the specific mechanisms Hatha yoga uses to make you a more robust runner. We will explore how static holds remodel your fascia, how conscious breathing can regulate your heart rate on the trail, and how to use simple tools to work around your body’s current limitations safely. It’s time to stop stretching and start rebuilding.
To navigate this deep dive into biomechanics and mindful practice, the following sections will break down each critical component. We’ll move from the cellular level of your connective tissues to practical, on-the-road breathing techniques.
Summary: A Runner’s Guide to Hatha Yoga for Injury-Proofing
- Why Holding a Pose for 3 Minutes Changes Fascia Better than Dynamic Stretching
- How to Use Yoga Breathing to Lower Your Heart Rate During a Run
- Hatha or Vinyasa: Which is Safer for Tired Muscles After a Marathon?
- The Alignment Error in Forward Folds that Causes Herniated Discs
- How to Use Blocks to Access Poses Your Stiff Hips Won’t Allow
- How to Build “Bulletproof” Ankles in 15 Minutes a Week
- The Breathing Mistake that Increases Blood Pressure During Core Work
- Pilates or Yoga: Which Fixes Lower Back Pain for Cyclists?
Why Holding a Pose for 3 Minutes Changes Fascia Better than Dynamic Stretching
The difference between a quick, dynamic stretch and a sustained Hatha yoga hold is the difference between temporarily elongating a tissue and fundamentally remodeling it. Your fascia, the web of connective tissue that encases every muscle and organ, is thixotropic. This means it becomes more fluid and pliable when subjected to slow, sustained pressure, but remains stiff and resistant to fast, abrupt forces. Dynamic stretching, like leg swings, operates too quickly to create this change.
To achieve a true release, you need to trigger a phenomenon known as fascial creep. This is the gradual deformation of viscoelastic tissues under a constant, low-grade load. When you hold a yoga pose for an extended period—typically two to five minutes—you are applying this precise stimulus. The initial resistance you feel is the elastic quality of the tissue. But as you hold, the internal viscosity of the fascia begins to decrease, allowing the collagen fibers to slowly glide apart and rehydrate.
This isn’t just a theory; it’s a biomechanical reality. In fact, research on myofascial release shows that five minutes or longer of sustained pressure creates a bio-electrical flow, or piezoelectricity, which signals cells called fibroblasts to begin the remodeling process. These cells break down old, dense adhesions and lay down new, more organized and hydrated fibers. A 30-second quad stretch can’t do this. A three-minute supported lunge, however, initiates a cascade of cellular repair that builds a more pliable and resilient runner’s body.
How to Use Yoga Breathing to Lower Your Heart Rate During a Run
For runners, mastering exertion is only half the battle; mastering recovery is what leads to breakthroughs. Yoga teaches that the breath (pranayama) is a direct control lever for the autonomic nervous system. The ability to consciously slow your heart rate after a hill climb or during a long, steady effort can significantly improve your efficiency and endurance. This is achieved by shifting from a sympathetic (fight-or-flight) state to a parasympathetic (rest-and-digest) state.
A powerful technique for this is cadence breathing. By synchronizing your breath to your footfalls, you create a meditative rhythm that calms the nervous system and focuses the mind. Initially, you might try a 3:3 pattern: inhaling for three steps and exhaling for three steps. The key is to practice this using only nasal breathing. Breathing through your nose increases air resistance, warms and filters the air, and most importantly, increases your tolerance to carbon dioxide (CO2). This enhanced CO2 tolerance improves oxygen delivery to your muscles via the Bohr effect, making you a more efficient runner.

When you need to actively lower your heart rate, such as after a hard surge, you can shift your pattern to emphasize the exhale. The exhale is directly linked to the parasympathetic response. By switching to an extended exhale pattern—for example, inhaling for three steps and exhaling for five steps—for just 60 seconds, you can trigger a noticeable drop in your heart rate. This practice turns your breath from an automatic function into a strategic tool for in-run recovery.
- Step 1: Synchronize your breath with your footfalls – inhale for 3 steps.
- Step 2: Exhale for 3 steps to create a meditative rhythm.
- Step 3: Practice nasal breathing to increase CO2 tolerance.
- Step 4: After hills, switch to an extended exhale pattern – inhale for 3 steps, exhale for 5 steps.
- Step 5: Continue this extended pattern for 60 seconds to trigger the parasympathetic response.
Hatha or Vinyasa: Which is Safer for Tired Muscles After a Marathon?
After pushing your body to its limit in a marathon, your muscles are not just tired; they are filled with micro-tears and inflammation. The goal of post-race movement should be to facilitate recovery, not to add more stress. This is where the distinction between Hatha and Vinyasa yoga becomes critically important for a runner’s safety. While both are beneficial in a training cycle, their effects on a depleted system are polar opposites.
Vinyasa yoga is characterized by its dynamic, flowing sequences, often linking breath to movement in a continuous series of poses like Sun Salutations. This style is up-regulating, meaning it stimulates the sympathetic nervous system. For a body already in a state of profound stress post-marathon, a Vinyasa class can be counterproductive, increasing heart rate and potentially leading to overstretching of vulnerable, fatigued muscles. It’s an excellent form of cross-training, but best saved for when you are fully recovered.
Hatha yoga, in contrast, focuses on holding individual poses with an emphasis on alignment and stability. It is inherently down-regulating, activating the parasympathetic nervous system which governs cellular repair. By using props like blocks and bolsters to support the body in passive poses, Hatha allows muscles to release without the risk of strain. Poses like Legs-Up-The-Wall (Viparita Karani) or a supported spinal twist gently flush metabolic waste and reduce inflammation without demanding further muscular effort.
The following table, based on principles outlined in guides for post-run recovery yoga, clearly breaks down the choice.
| Aspect | Hatha Yoga | Vinyasa Yoga |
|---|---|---|
| Nervous System Effect | Down-regulating (parasympathetic) | Up-regulating (sympathetic) |
| Recovery Impact | Promotes cellular repair | Adds stress to depleted system |
| Muscle Safety | Passive poses with props | Dynamic movement risks overstretching |
| Recommended Timing | Immediately post-marathon | After full recovery (3-7 days) |
| Key Poses | Legs-Up-The-Wall, supported twists | Sun salutations, flowing sequences |
The Alignment Error in Forward Folds that Causes Herniated Discs
The forward fold (Uttanasana) is a classic stretch for a runner’s tight hamstrings. However, performed incorrectly, it is one of the most common ways to strain the lower back and even contribute to disc herniation. The critical error is rounding the lumbar spine. Many runners, in their eagerness to touch their toes, initiate the fold from their waist, forcing the vertebrae of the lower back to flex excessively. This places immense pressure on the intervertebral discs.
The correct and safe movement is a pure hip hinge. The spine should remain long and neutral, as if a plank were strapped to your back, while the entire movement pivots from the hip sockets. This action isolates the stretch in the hamstrings and glutes, the intended targets, while protecting the delicate structures of the spine. For runners with chronically tight hamstrings, achieving this pure hinge can feel impossible, as the body’s default is to compensate by rounding the back.
This is where mindful practice becomes a powerful diagnostic and corrective tool. You must re-educate your body on this fundamental movement pattern. A simple test can reveal your default habit and provide a clear path for correction. The goal is to separate hip flexion from spinal flexion, a skill that will protect you not only in yoga but also in daily activities like lifting objects.
Action Plan: The Wall Hinge Test for a Safe Forward Fold
- Positioning: Stand with your back completely flat against a wall, including your sacrum and shoulder blades. Place your feet hip-width apart, about six inches away from the wall.
- Initiate the Hinge: With a micro-bend in your knees, begin to hinge forward from your hip crease. Imagine your pelvis is a bowl of water you are trying to tip forward without spilling.
- Monitor the Spine: The goal is to keep your lower back in contact with the wall for as long as possible. The moment your lower back rounds and pulls away from the wall, you have reached the end of your hamstrings’ flexibility.
- Identify the Compensation: If your back immediately rounds, this confirms that your brain is prioritizing spinal flexion over a true hip hinge due to tight hamstrings. This is your specific pattern to correct.
- Corrective Practice: Practice this micro-hinge movement daily, with knees generously bent. Focus only on the sensation of pivoting from the hip joints while keeping the spine neutral, similar to the starting position of a Romanian Deadlift.
How to Use Blocks to Access Poses Your Stiff Hips Won’t Allow
For a stiff runner, seeing an experienced yogi fold effortlessly into a deep hip-opening pose can be demoralizing. The tendency is to force the body into a shape it’s not ready for, leading to compensation, poor alignment, and potential injury. Yoga blocks are not a crutch for beginners; they are precision tools that allow you to maintain biomechanical integrity while your body gradually adapts. They bring the floor up to you, enabling you to find a safe and effective version of a pose.
Consider Pigeon Pose (Eka Pada Rajakapotasana), a potent stretch for the piriformis muscle, which is often tight in runners. A stiff runner will typically collapse onto the hip of the front leg, torquing the knee and failing to access the target muscle. By placing a block under the front hip, you level the pelvis. This simple adjustment stabilizes the pose, protects the knee joint, and correctly isolates the stretch in the deep external rotators of the hip. The block allows for a productive stretch instead of a painful collapse.
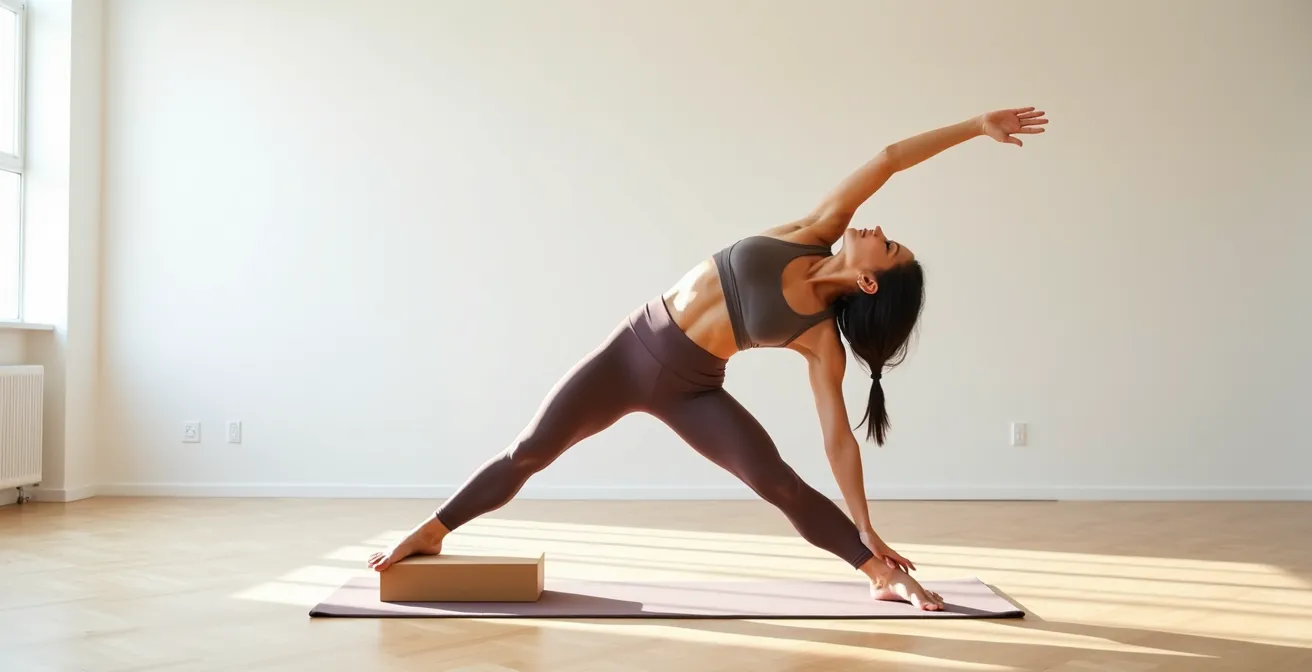
Similarly, in a Low Lunge, stiff hips can cause the torso to round forward, compressing the lower back. Placing blocks under your hands elevates your torso, creating space to lengthen the spine and deepen the stretch in the psoas (a key hip flexor) of the back leg. For any seated forward fold, simply sitting on a block can be a game-changer. It tilts the pelvis forward, making a safe hip hinge accessible even with the tightest hamstrings.
Block Application: Preventing Plantar Fasciitis in Hero’s Pose
A common pose, Hero’s Pose (Virasana), involves sitting between the heels and can create an intense stretch on the tops of the feet and ankles. For runners with tight plantar fascia, this can be agonizing and even inflammatory. As experts on yoga for runners suggest, placing a yoga block under your seat, between your heels, and sitting on the block rather than the floor is a critical modification. This elevates the hips, reduces the angle of flexion at the knee and ankle, and minimizes the risk of overstretching and inflaming the plantar fascia, turning a risky pose into a therapeutic one.
How to Build “Bulletproof” Ankles in 15 Minutes a Week
Running is a linear, repetitive motion. This is why a runner’s ankles can be strong in a straight line but incredibly vulnerable to the slightest roll on an uneven surface. Building “bulletproof” ankles isn’t about brute strength; it’s about sophisticated proprioceptive training. Proprioception is your body’s awareness of its position in space. By challenging your ankles in multiple directions and on unstable surfaces, you are training the neural pathways between the ankle joint and the brain to react faster, creating reflexive stability.
Hatha yoga provides the perfect environment for this training. Poses that demand single-leg balancing are not just tests of balance; they are neurological drills. When you stand in Tree Pose (Vrksasana), your ankle is making thousands of micro-adjustments per second, strengthening the muscles, ligaments, and neural feedback loops that prevent a sprain on the trail. This is far more effective than simply doing calf raises.
A consistent, focused routine is more valuable than sporadic, intense sessions. Dedicating just 15 minutes a week to a specific ankle resilience protocol can dramatically reduce your risk of injury. This isn’t about stretching; it’s about activation and stabilization through a full range of motion.
The 15-Minute Weekly Ankle Resilience Protocol:
- (5 mins) Foot Activation: Begin in Mountain Pose (Tadasana). Practice “toe yoga” by lifting and spreading your toes, then trying to press just your big toe down while keeping the others lifted, and vice-versa. This activates the intrinsic muscles of the foot, the foundation of your ankle.
- (5 mins) Proprioceptive Sequencing: Move through a single-leg balancing sequence. A great combination for runners is transitioning from Tree Pose (challenging stability) directly into Eagle Pose (Garudasana), which loads the ankle in a controlled, twisted position. Hold each for 30-60 seconds per leg.
- (5 mins) Deep Mobility: Finish in a supported Garland Squat (Malasana). If your heels lift, place a rolled blanket under them. This pose provides a deep, safe stretch for the Achilles tendon and improves dorsiflexion, a common limitation for runners.
The Breathing Mistake that Increases Blood Pressure During Core Work
Effective core work is essential for a runner’s form and power transfer. However, many athletes make a critical breathing mistake during strenuous core exercises: they hold their breath. This action, known as the Valsalva maneuver, involves exhaling against a closed glottis (the back of the throat). While it can make you feel momentarily stronger by creating intra-abdominal pressure, it dangerously spikes your blood pressure and places undue strain on the cardiovascular system.
When you hold your breath under exertion, you increase pressure not just in your abdomen but also in your chest cavity. This can impede blood flow back to the heart. When you finally release the breath, the sudden change can cause a rapid drop or surge in blood pressure. For an athlete, this is an inefficient and potentially harmful way to stabilize the core. It creates rigidity rather than dynamic, responsive stability.
The yogic solution is simple and profoundly effective: exhale on exertion. This principle coordinates your breath with your effort to create stability safely. By forcefully exhaling (making a “ha” sound) during the most difficult part of a movement—like lifting your legs in a leg raise or drawing up into a crunch—you automatically engage the deepest core muscles, the transverse abdominis and the pelvic floor. This creates a “natural corset” of support without the dangerous pressure spike.
This protocol creates dynamic stability and can be applied directly to your running form:
- Identify the exertion phase of any core movement.
- Begin exhaling forcefully (like a ‘ha’ sound) during the effort phase.
- This automatically recruits the transverse abdominis and pelvic floor.
- The result is dynamic stability without dangerous pressure spikes.
- Application to Running: Practice exhaling on your foot strike and inhaling during the “flight” phase to promote efficient energy transfer and a relaxed upper body.
Key Takeaways
- True mobility for runners comes from changing deep connective tissue (fascia), which requires sustained static holds, not quick dynamic stretching.
- Your breath is a direct tool to control your nervous system and heart rate during a run, enhancing recovery and efficiency through techniques like cadence breathing.
– Forcing a pose without proper alignment is counterproductive. Props like yoga blocks are precision tools that enable safe, effective stretching for stiff bodies.
Pilates or Yoga: Which Fixes Lower Back Pain for Cyclists?
While this question is often framed around cyclists, the underlying biomechanics of lower back pain from a sustained, forward-flexed posture are incredibly relevant to runners, especially those logging long hours or struggling with a weak core and tight hips. Modalities like Pilates are excellent for building core strength, but they can sometimes isolate this strength without addressing the holistic picture. A runner’s back pain is rarely just a “core” issue; it’s a symptom of a systemic imbalance, often involving tight hip flexors, weak glutes, and a rigid thoracic spine.
This is where yoga’s holistic approach offers a more comprehensive solution. It doesn’t just target one area. A well-rounded Hatha practice simultaneously addresses the multiple factors contributing to a runner’s back pain. For example, a single practice might include:
- Core Strengthening: Poses like Plank and Boat Pose (Navasana), performed with the correct “exhale on exertion” breath.
- Hip Flexor Lengthening: Supported Low Lunges that decompress the front of the hip and relieve the pull on the lumbar spine.
- Glute Activation: Poses like Bridge Pose (Setu Bandhasana) that “wake up” the glutes, encouraging them to take over the work of propulsion from the lower back and hamstrings.
- Spinal Mobility: Gentle twists that rehydrate the spinal discs and release tension in the muscles surrounding the spine.
Unlike a targeted gym exercise, yoga integrates these elements, teaching the body to work as a coordinated system. It improves not just strength and flexibility, but also the interoceptive awareness of how your body feels and moves. This heightened awareness is what allows you to self-correct your running form in real-time before pain starts. As the research team at Muscle and Motion notes in their study on the topic:
Yoga’s holistic approach, focusing on strength, flexibility, and mental well-being, aligns perfectly with the needs of runners. In the following sections, we will explore how incorporating yoga into a runner’s routine can be a game-changer in addressing the challenges these common injuries pose.
– Muscle and Motion Research Team, Muscle and Motion – Yoga for Runners Study
By integrating these Hatha yoga principles, you are not just stretching; you are upgrading your body’s entire operating system. The next logical step is to move from theory to practice by consistently applying these techniques to build a foundation of true, sustainable mobility for your running.